Order custom fields
Order custom fields can easily be added into any step of the checkout flow. To add a custom field, you'll need to override the default templates. When saving the form, they'll be automatically added to the cart's customFields object. They appear in the merchant dashboard as part of the order details.
Adding custom fields
Special form elements can be used to create order custom fields. HTML5 form validation can be used with those elements.
Adding a checkbox
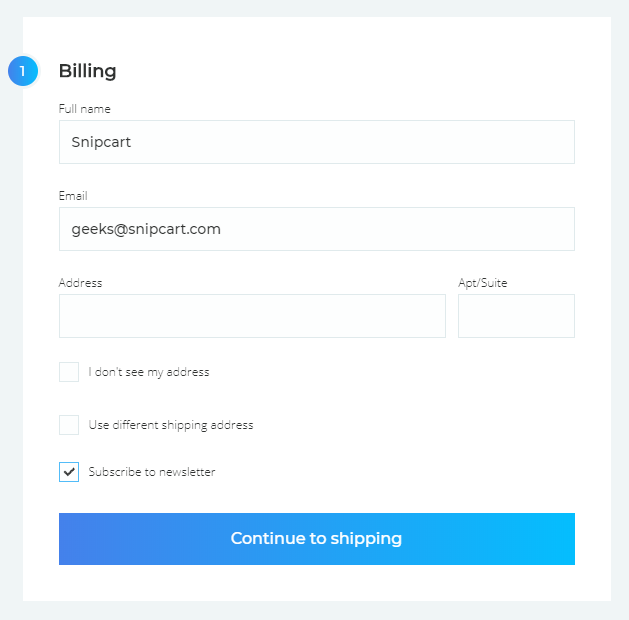
For instance, if you want to add a checkbox to the billing section to collect mailing list subscribers, you could do:
<billing section="bottom">
    <fieldset class="snipcart-form__set">
        <div class="snipcart-form__field">
            <div class="snipcart-form__field-checkbox">
                <snipcart-checkbox name="subscribeToNewsletter"></snipcart-checkbox>
                <snipcart-label for="subscribeToNewsletter" class="snipcart__font--tiny snipcart-form__label--checkbox">
                    Subscribe to newsletter
                </snipcart-label>
            </div>
        </div>
    </fieldset>
</billing>
It should look like this:
Adding a dropdown
<billing section="bottom">
    <fieldset class="snipcart-form__set">
        <div class="snipcart-form__field">
            <snipcart-label for="customerType" class="snipcart__font--tiny" for="customerType">
                Customer type
            </snipcart-label>
            <snipcart-select name="customerType" class="snipcart-form__select  snipcart__font--secondary snipcart__font--bold">
                <option value="Corporate">Corporate</option>
                <option value="Personal">Personal</option>
                <option value="NonProfit">Non-profit</option>
            </snipcart-select>
        </div>
    </fieldset>
</billing>
Adding radio buttons
<billing section="bottom">
    <fieldset class="snipcart-form__set">
        <div class="snipcart-form__field">
            <p class="snipcart__font--tiny">Customer type</p>
            <snipcart-radio name="customerType" value="Corporate">
                Corporate
            </snipcart-radio>
            <snipcart-radio name="customerType" value="Personal">
                Personal
            </snipcart-radio>
            <snipcart-radio name="customerType" value="NonProfit">
                Non-profit
            </snipcart-radio>
        </div>
    </fieldset>
</billing>
Adding a textbox
snipcart-input can be used for simple textbox and snipcart-textarea can be used for multiline text:
<billing section="bottom">
    <fieldset class="snipcart-form__set">
        <div class="snipcart-form__field">
            <snipcart-label class="snipcart__font--tiny" for="vatNumber">
                VAT Number
            </snipcart-label>
            <snipcart-input name="vatNumber"></snipcart-input>
        </div>
    </fieldset>
</billing>
Privacy Policy check box in the payment step
You can add snipcart-inputs in any step of the checkout.
<payment section="top">
<div>
<p>
<snipcart-checkbox name="privacy-policy" required></snipcart-checkbox>
<snipcart-label for="privacy-policy">I have read and agree to the <a href="#">Privacy Policy</a></snipcart-label>
</p>
</div>
</payment>