Store management
When you log in to your merchant dashboard, you land on the Manage store section. This is where you can track sales & orders, manage orders & customers, and set up discounts for your store.
1. Dashboard
This section offers a comprehensive, visual overview of your e-commerce operation with Snipcart.
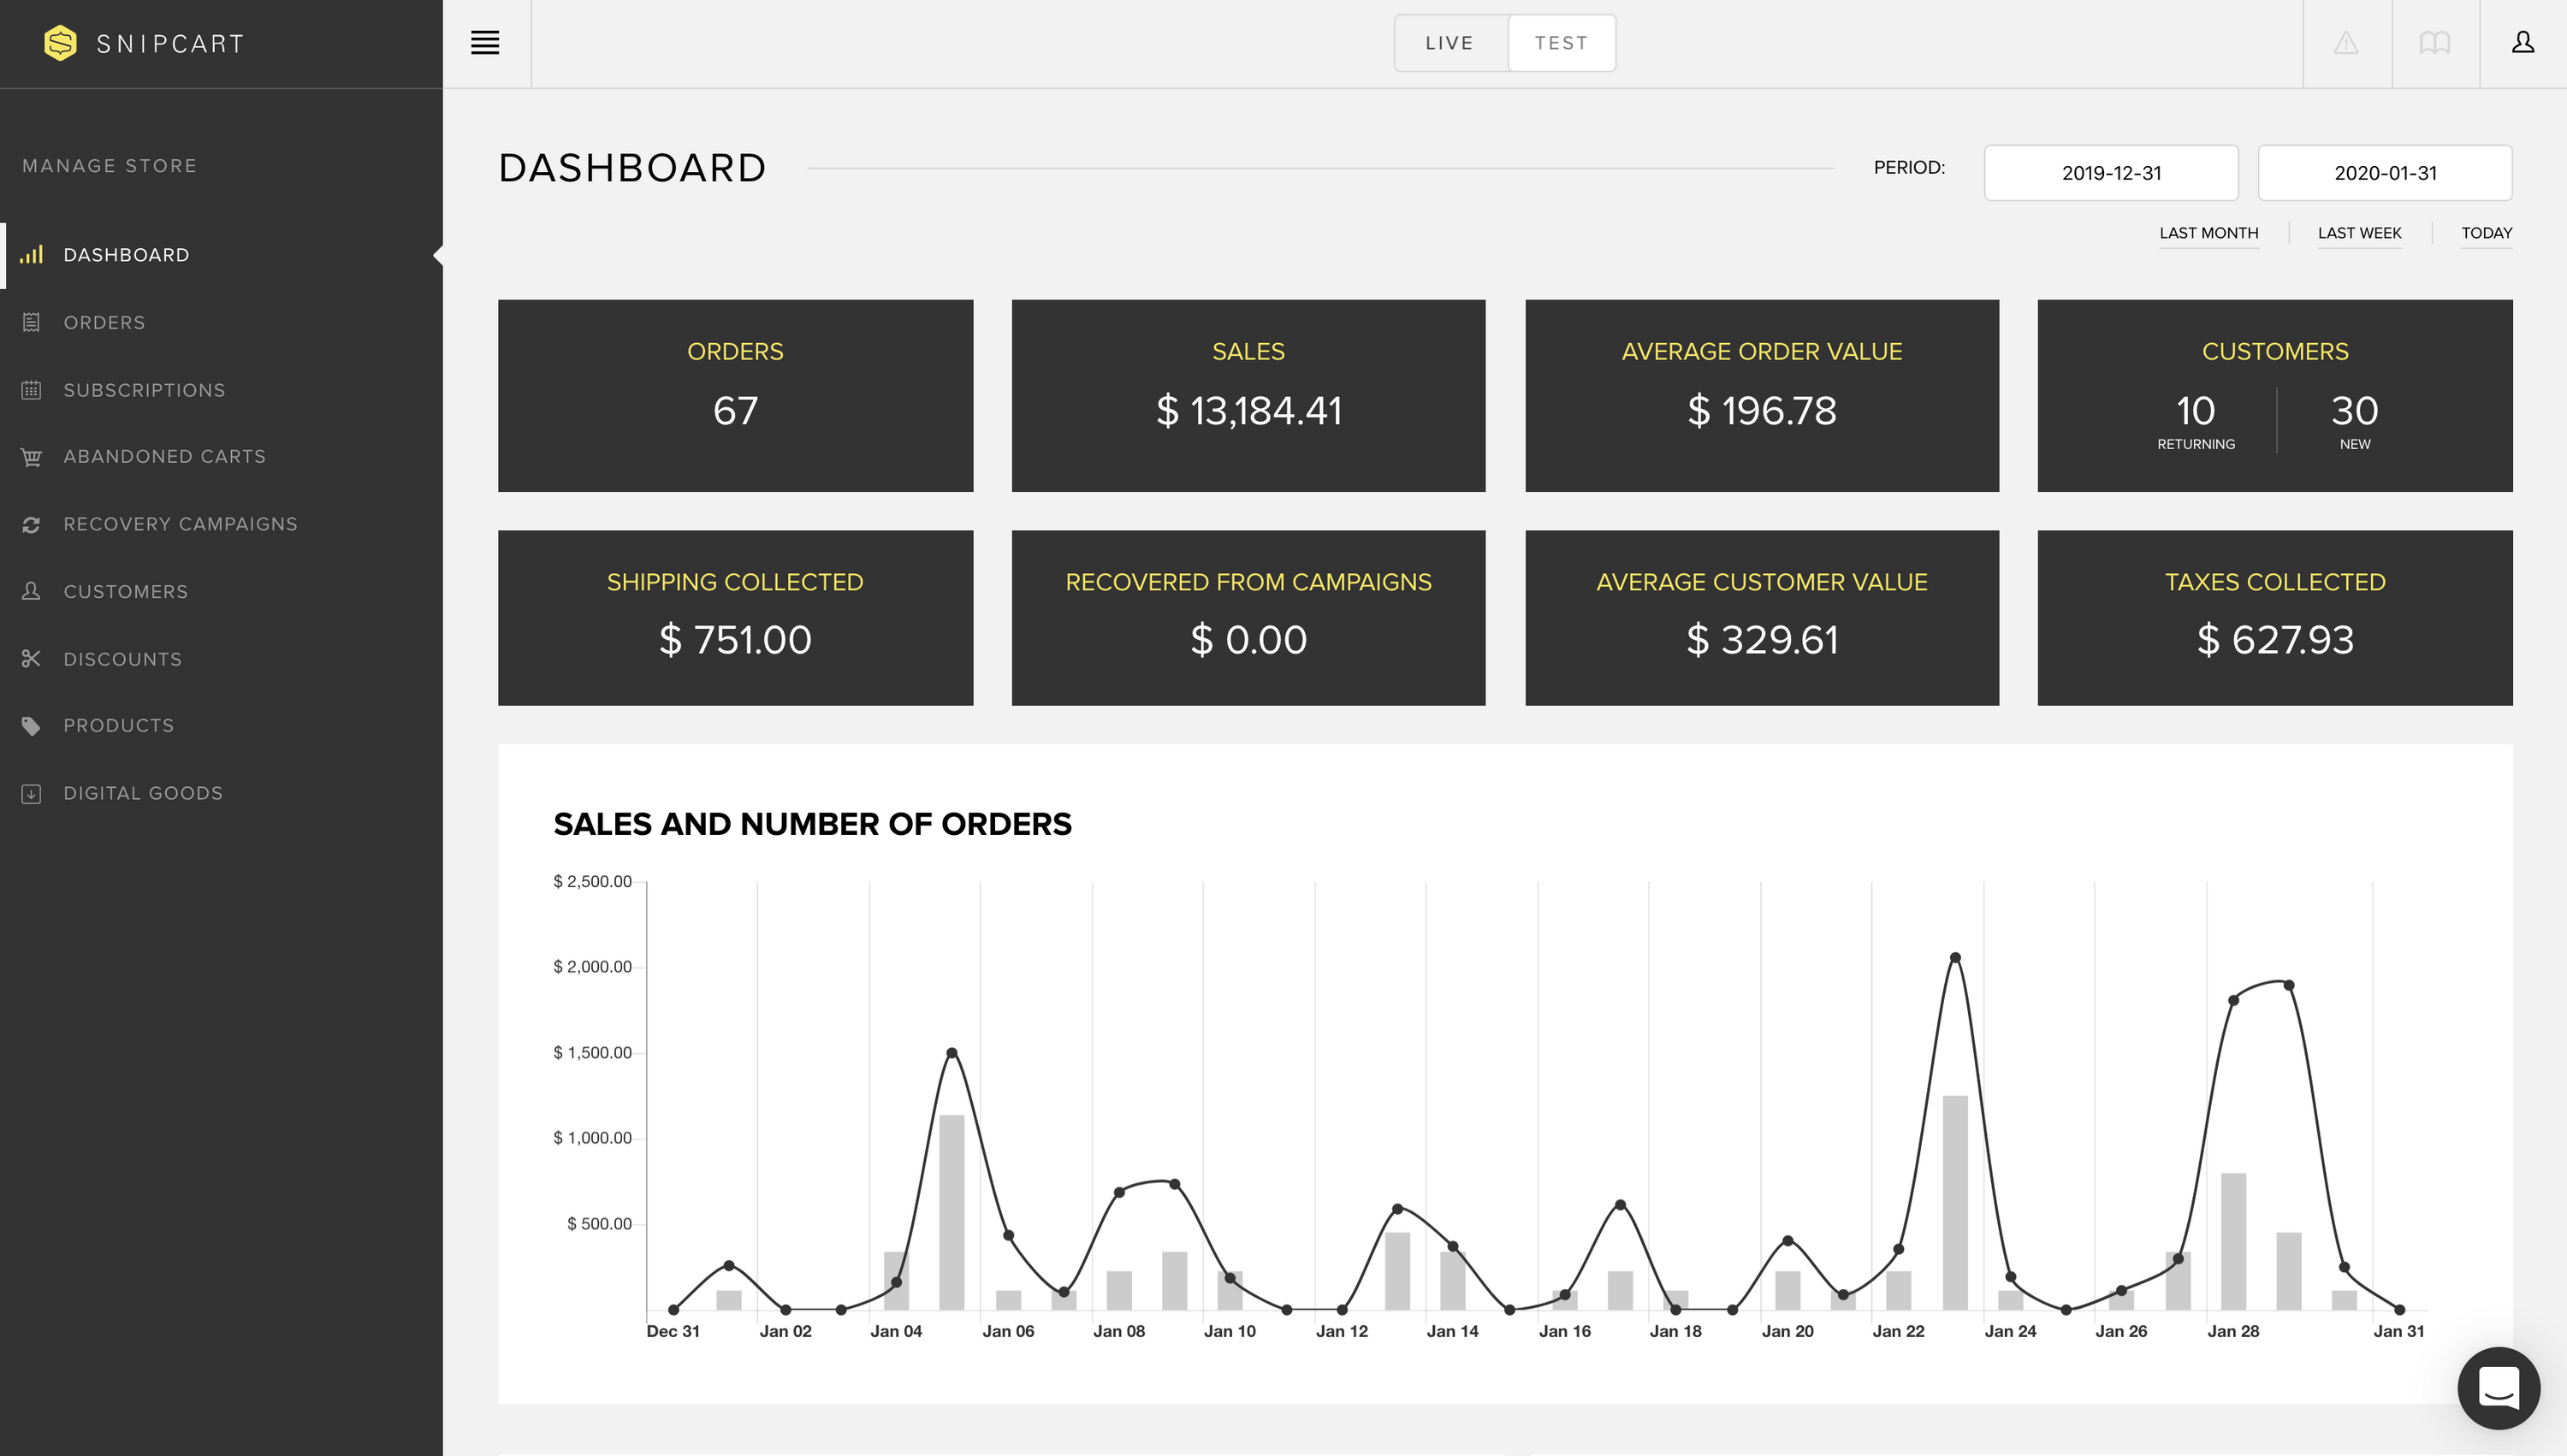
You will always see a default display of your last month's data when you log in. However, you can filter data by any time period you'd like by using the dates selector.
The highlighted boxes will show you:
- Total number of orders
- Total sales
- Average order value
- Ratio of returning vs. new customers
- Shipping fees collected
- Sales recovered from cart recovery campaigns
- Average customer value
- Taxes collected
The double graph will show you:
- Sales by period & day
- Orders by period & day
- A visual cue for average order value (distance between graph and line)
To get data for a single day, simply hover on the graph bar:

The top customers & products section will show you:
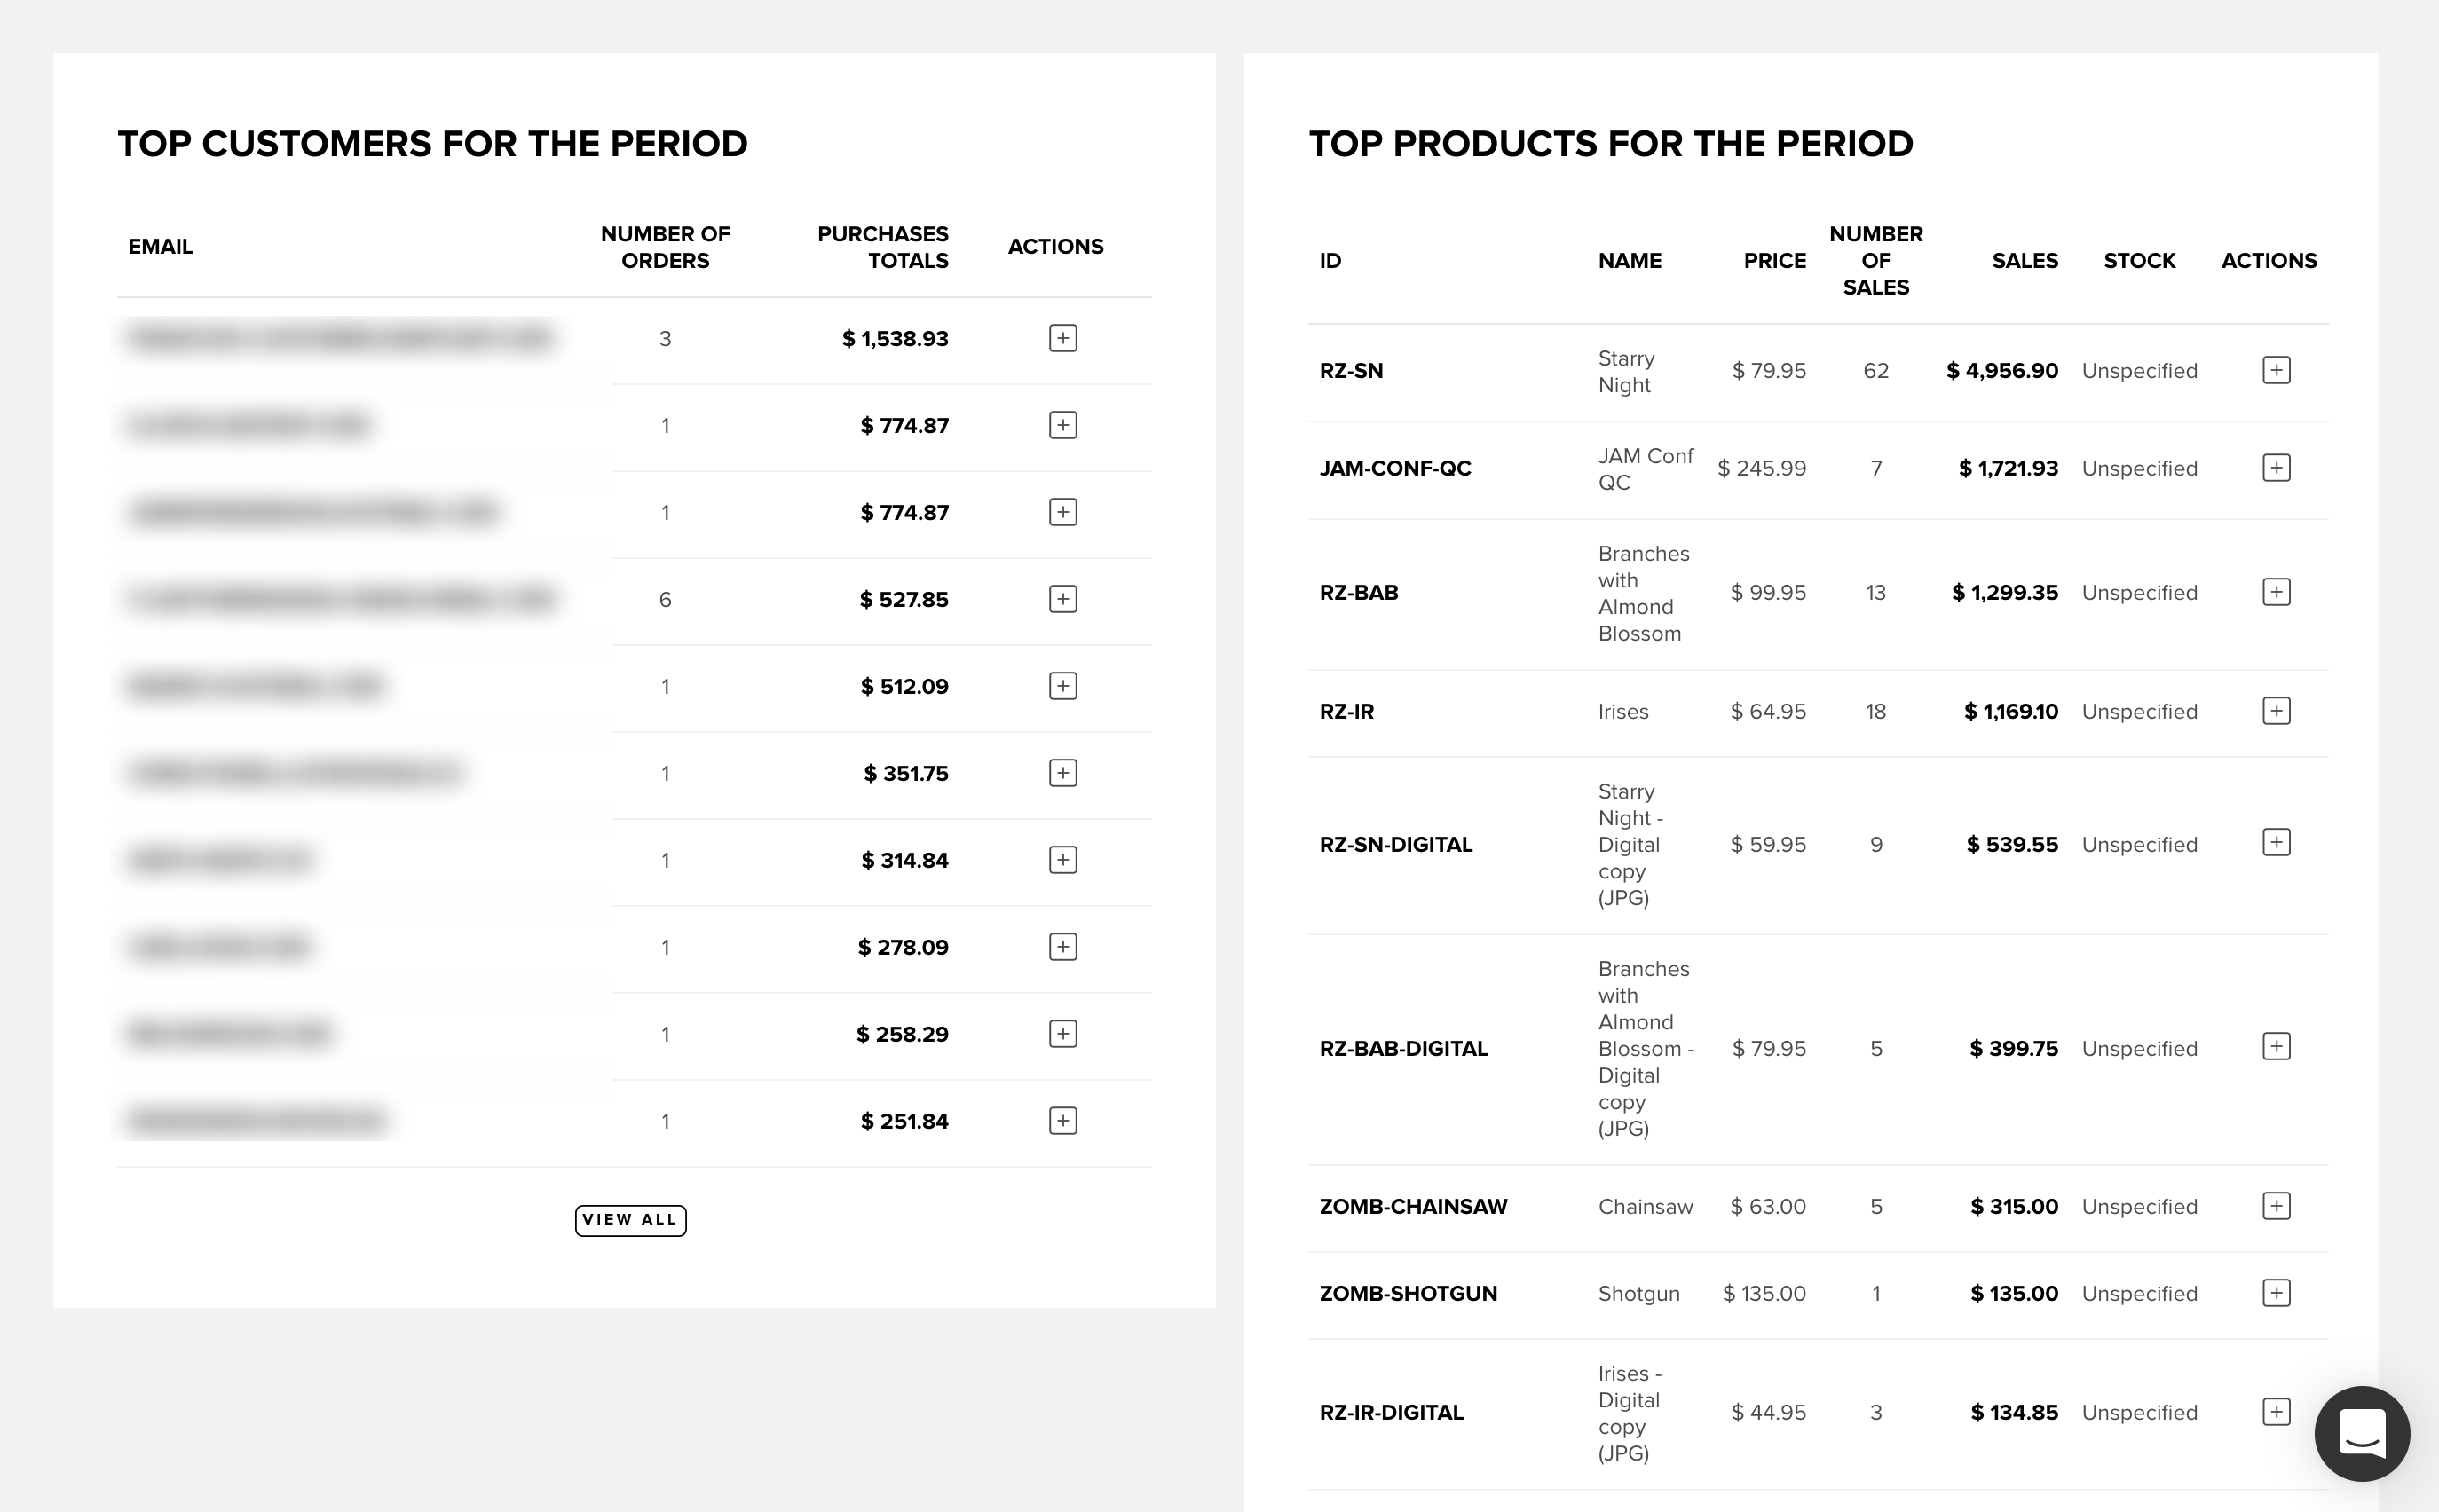
- Top 10 customers with highest purchase totals for selected period
- Top 10 products with highest sales for selected period
At the bottom of that same screen, you'll also find a list of the most recently completed orders on your store.
2. Orders
This section contains a full list of all the orders placed on your store through Snipcart. You can search it with 4 different filters:
- Status (processed, disputed, shipped, delivered, pending, canceled)
- Invoice number
- Placed by (customer name)
- Date (from and to range)
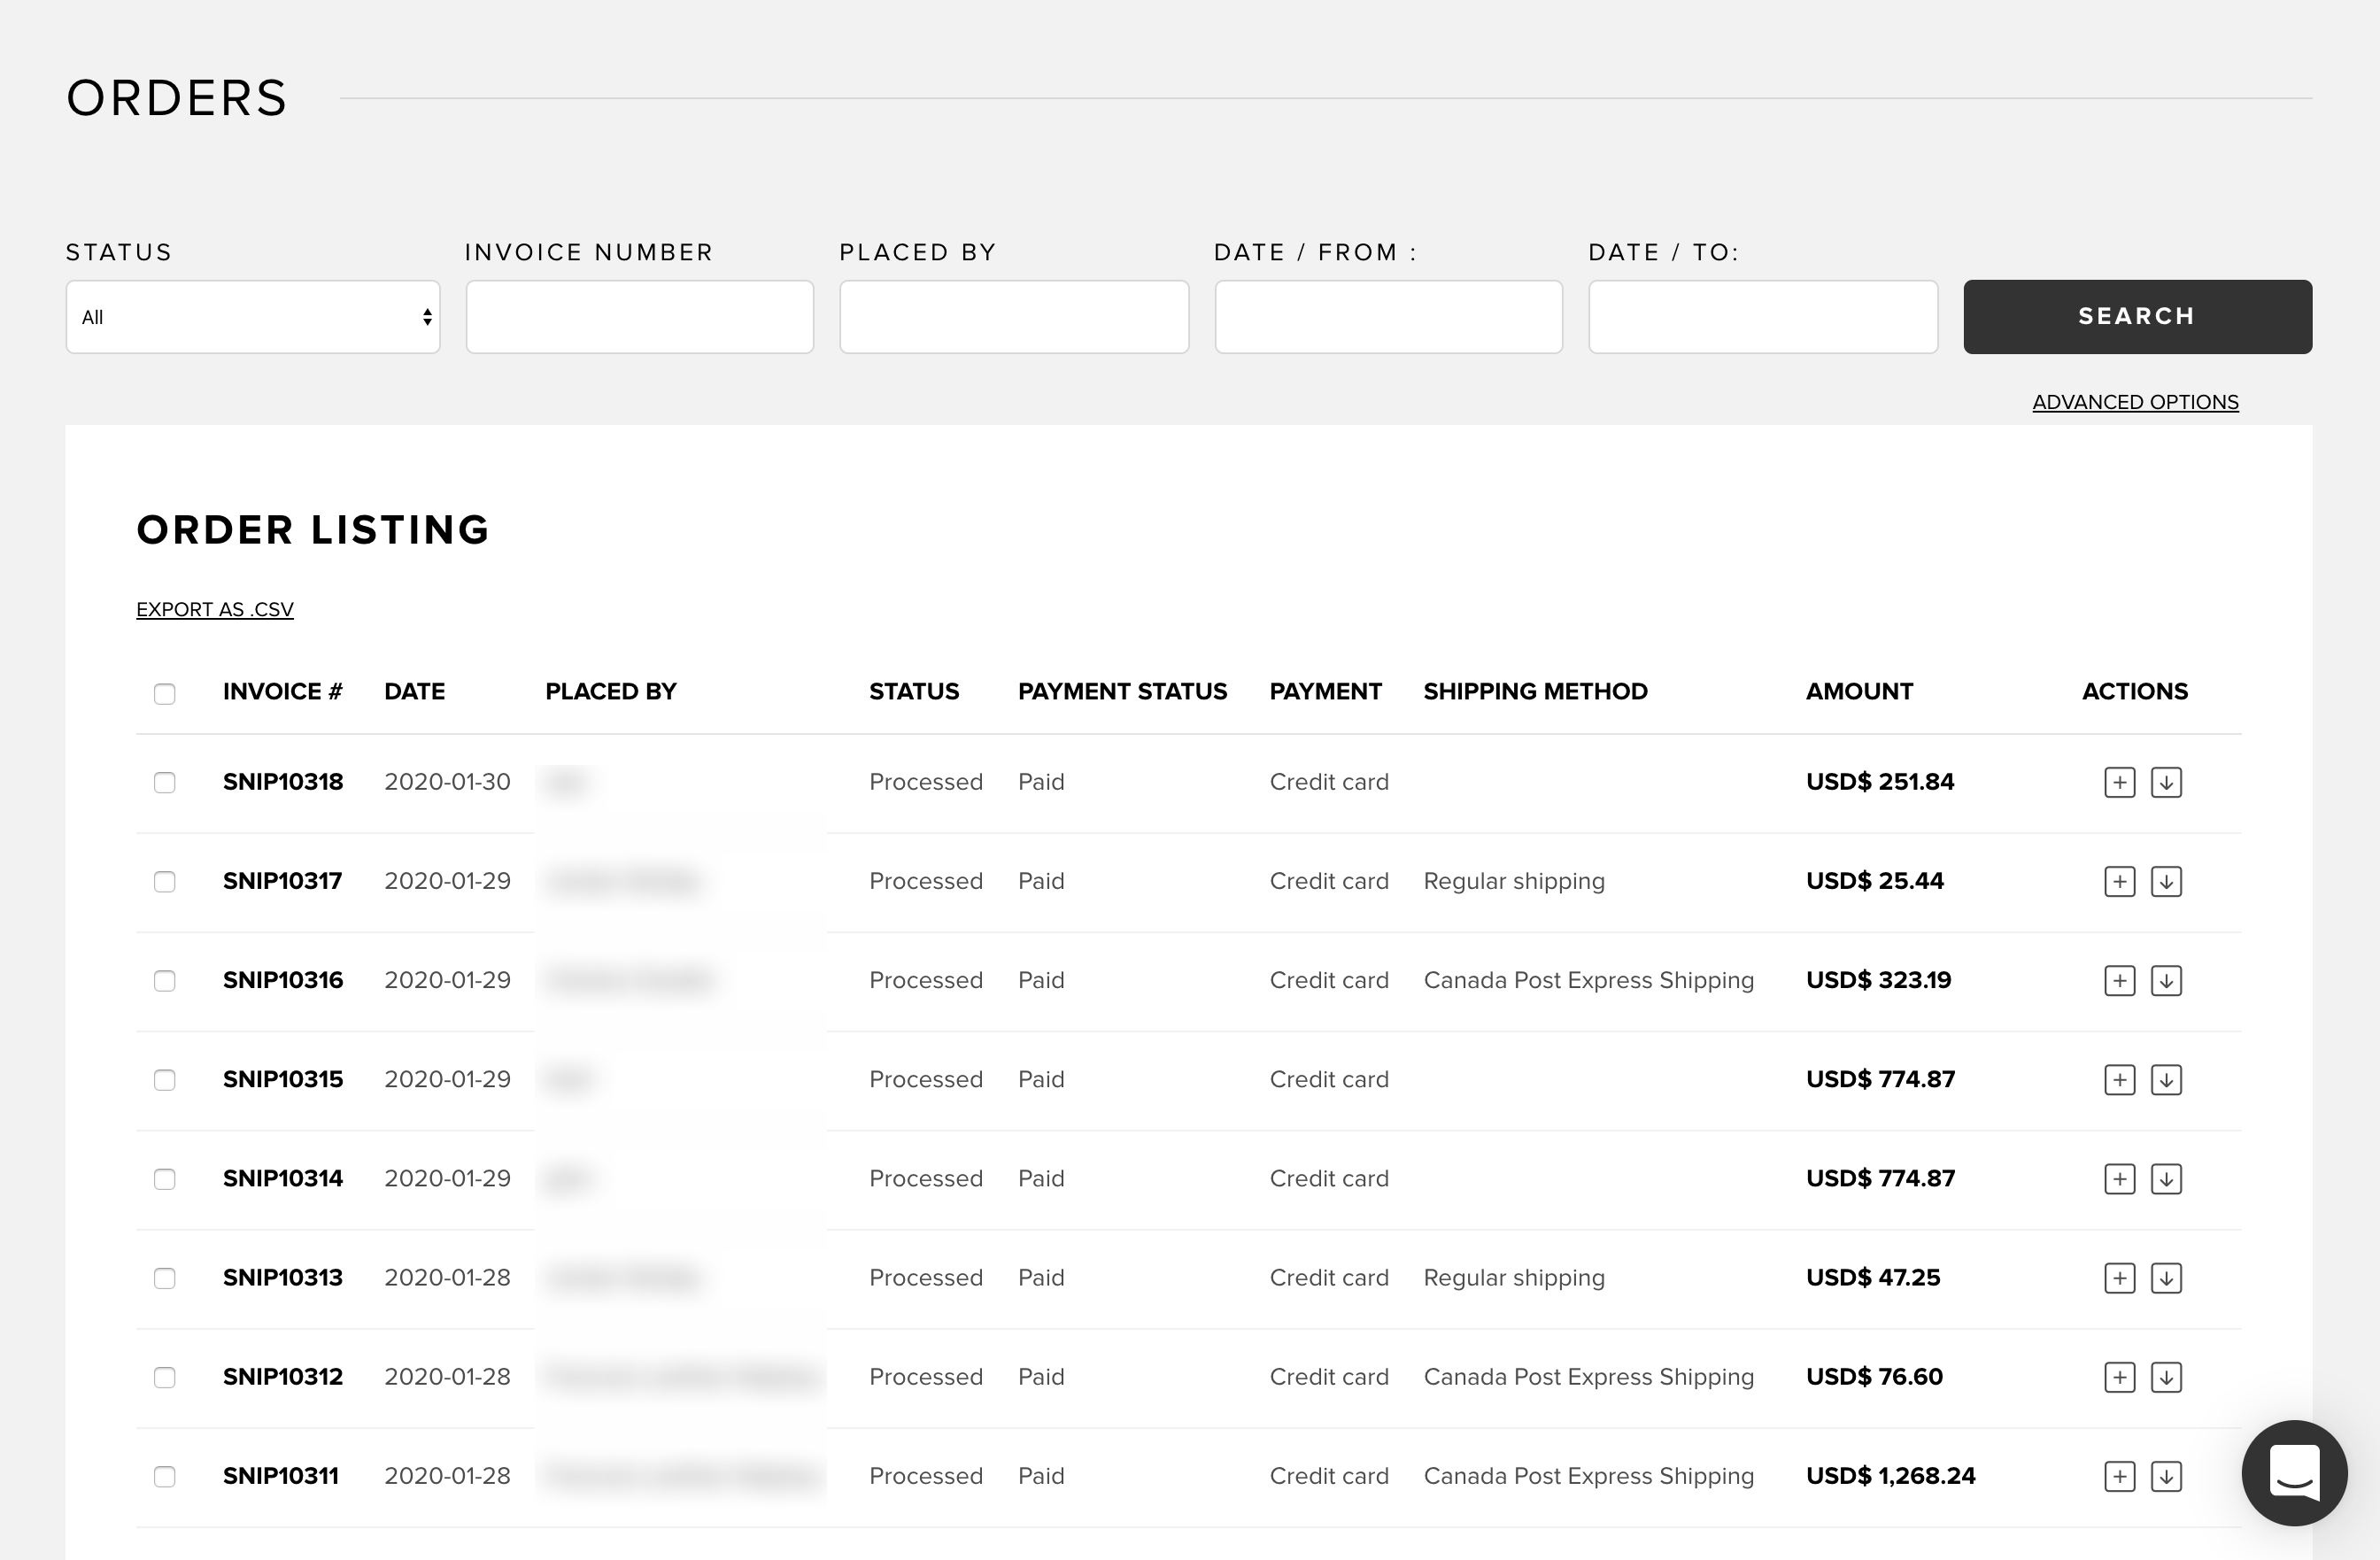
There are also two advanced options available for filtering orders:
- Payment status
- Containing product
- Recovered with campaign (initially abandoned carts orders)
You can export filtered orders as a .csv file. It might come in handy for accounting or importing orders into other systems.
2.1 Order details
To see an order's details, click on its entry in the full order list. You'll access a detailed section filled with useful info regarding a specific order, as illustrated below:
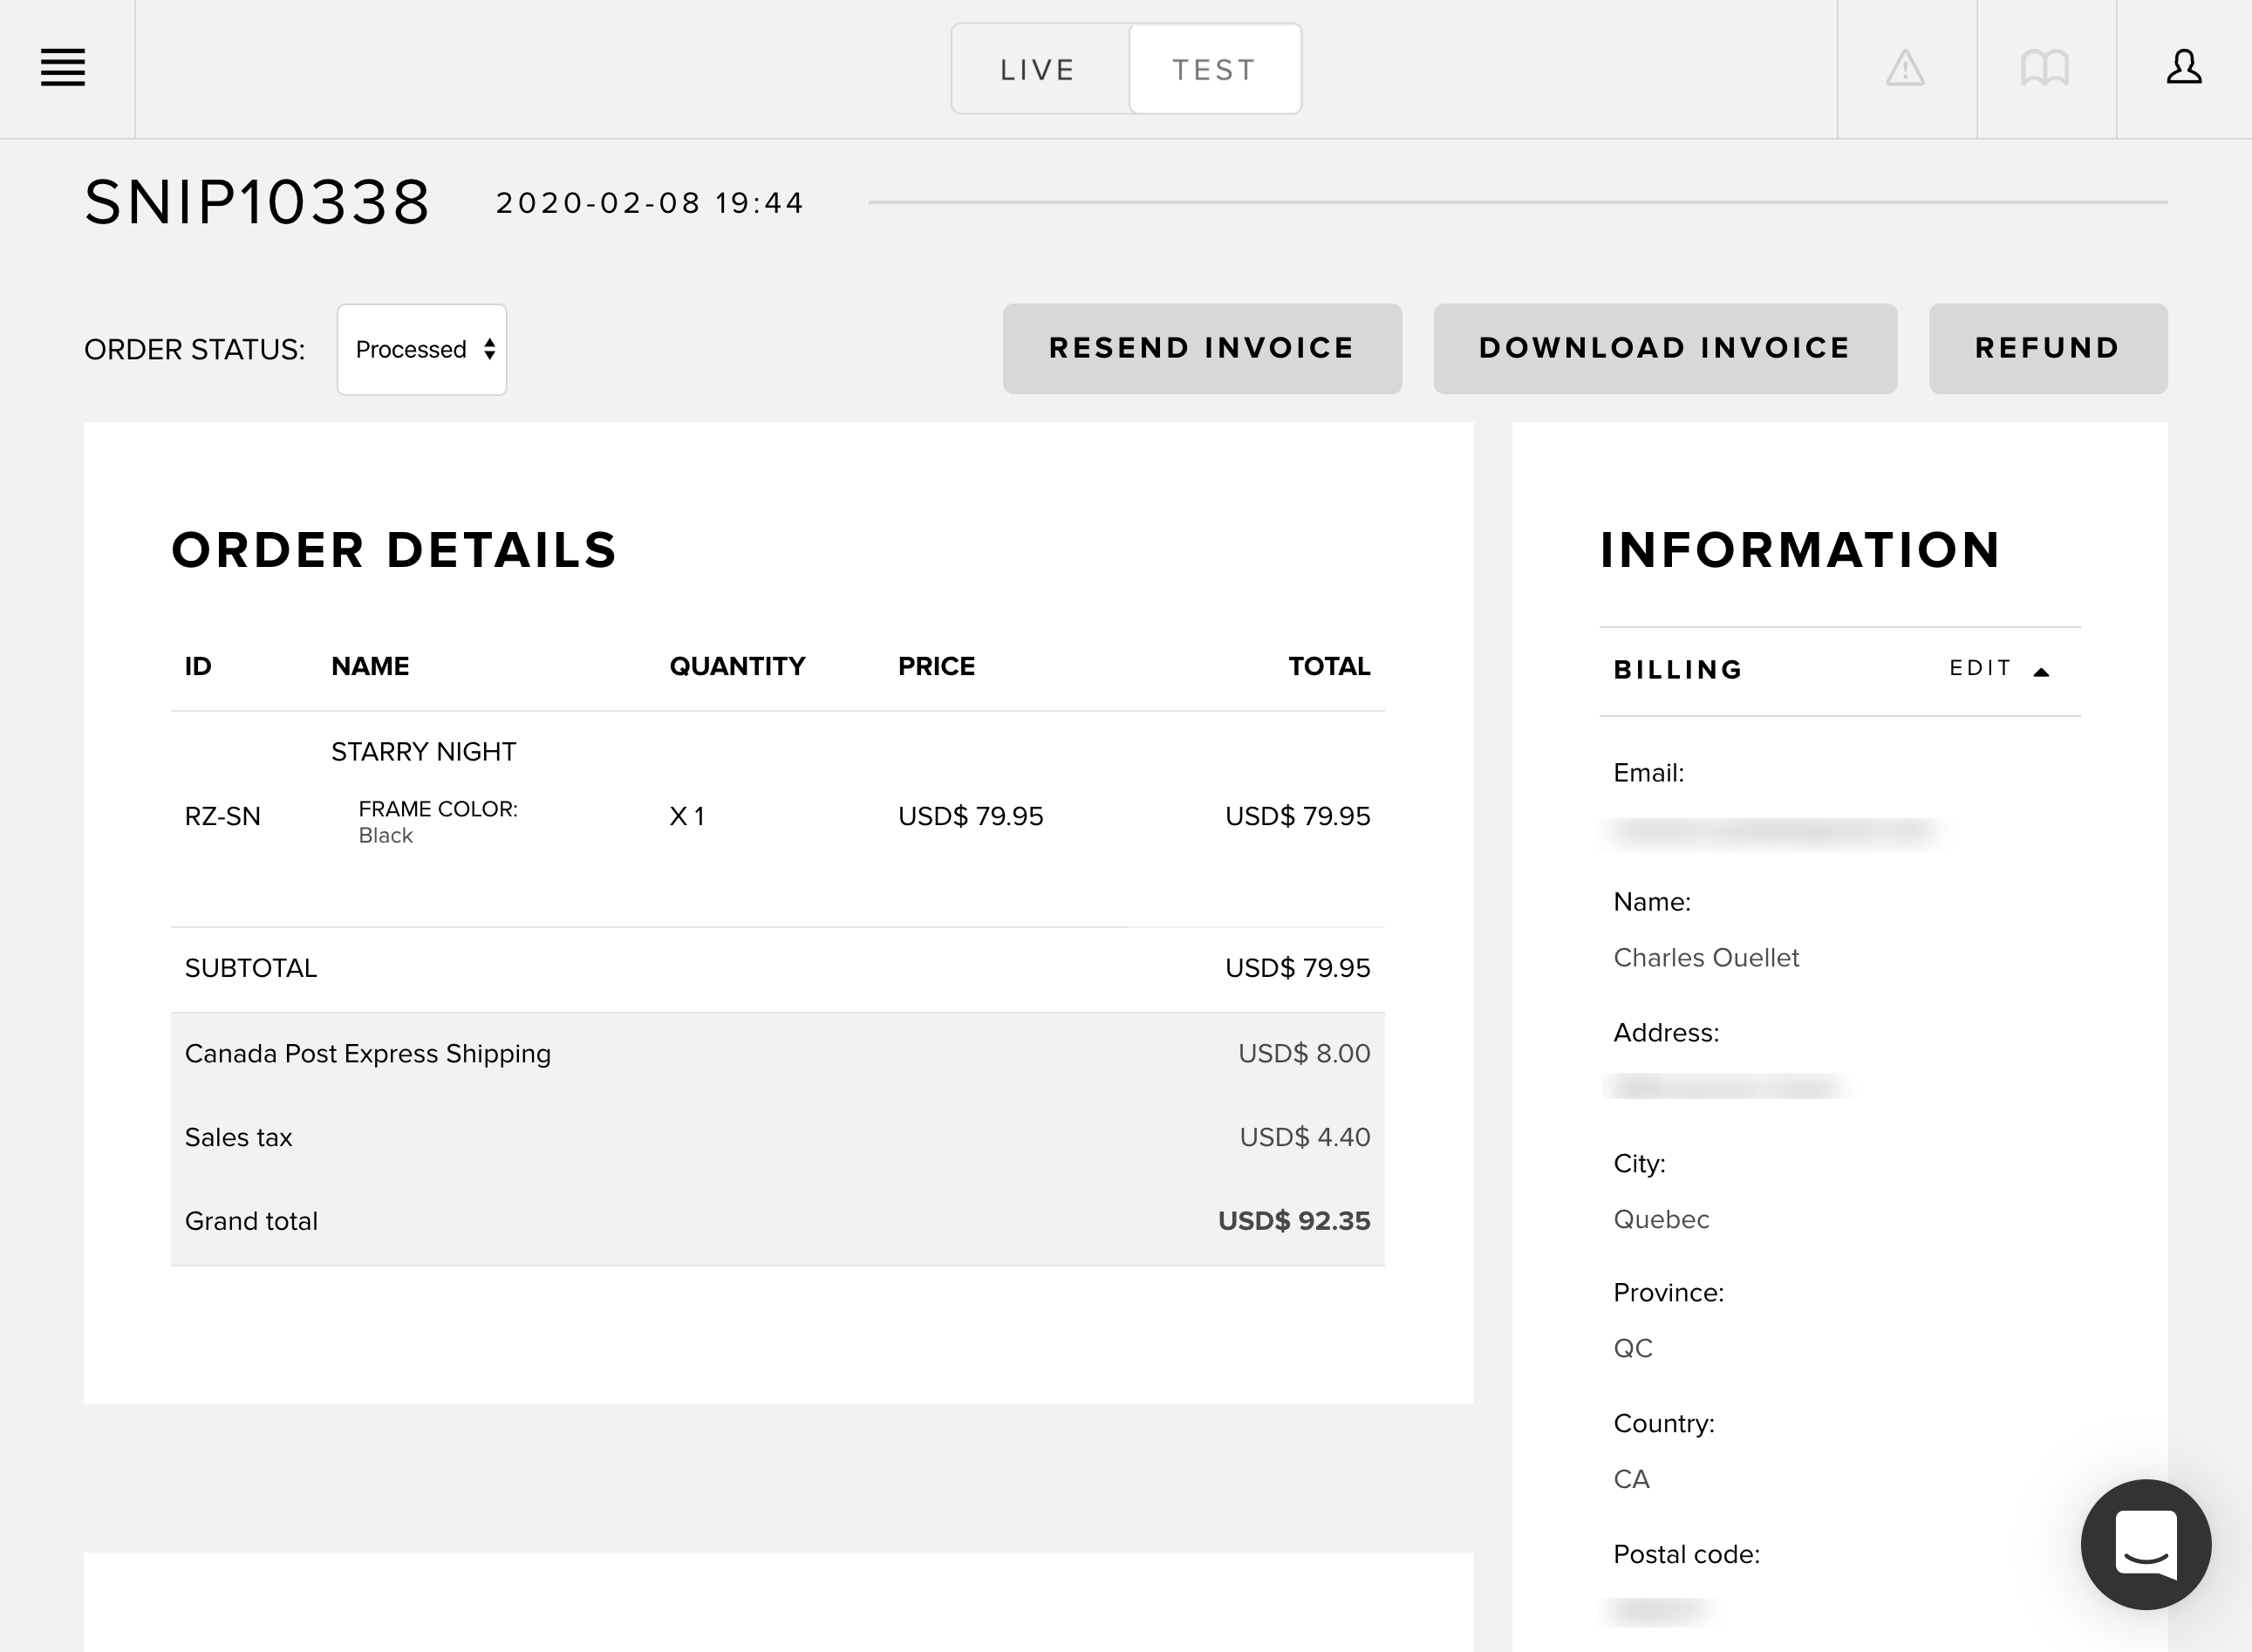
You can download the order invoice using the "Download invoice" button at the top.
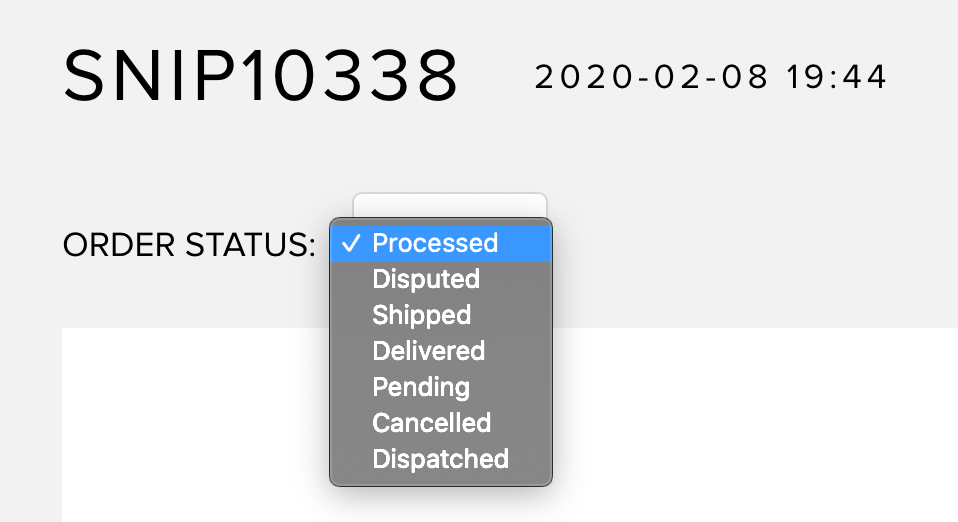
Changing an order status
Using the Order status selector on the top left, you can update an order's status.
Please note that this option is only useful for updating and tracking orders manually.
If you wish to automate order management using status, consider using our webhooks. You can also update order status in Snipcart via our REST API.
2.2 Order refunds
You can handle partial and total order refunds directly in your order's details page. To do so, click on the refund button on the order details page.
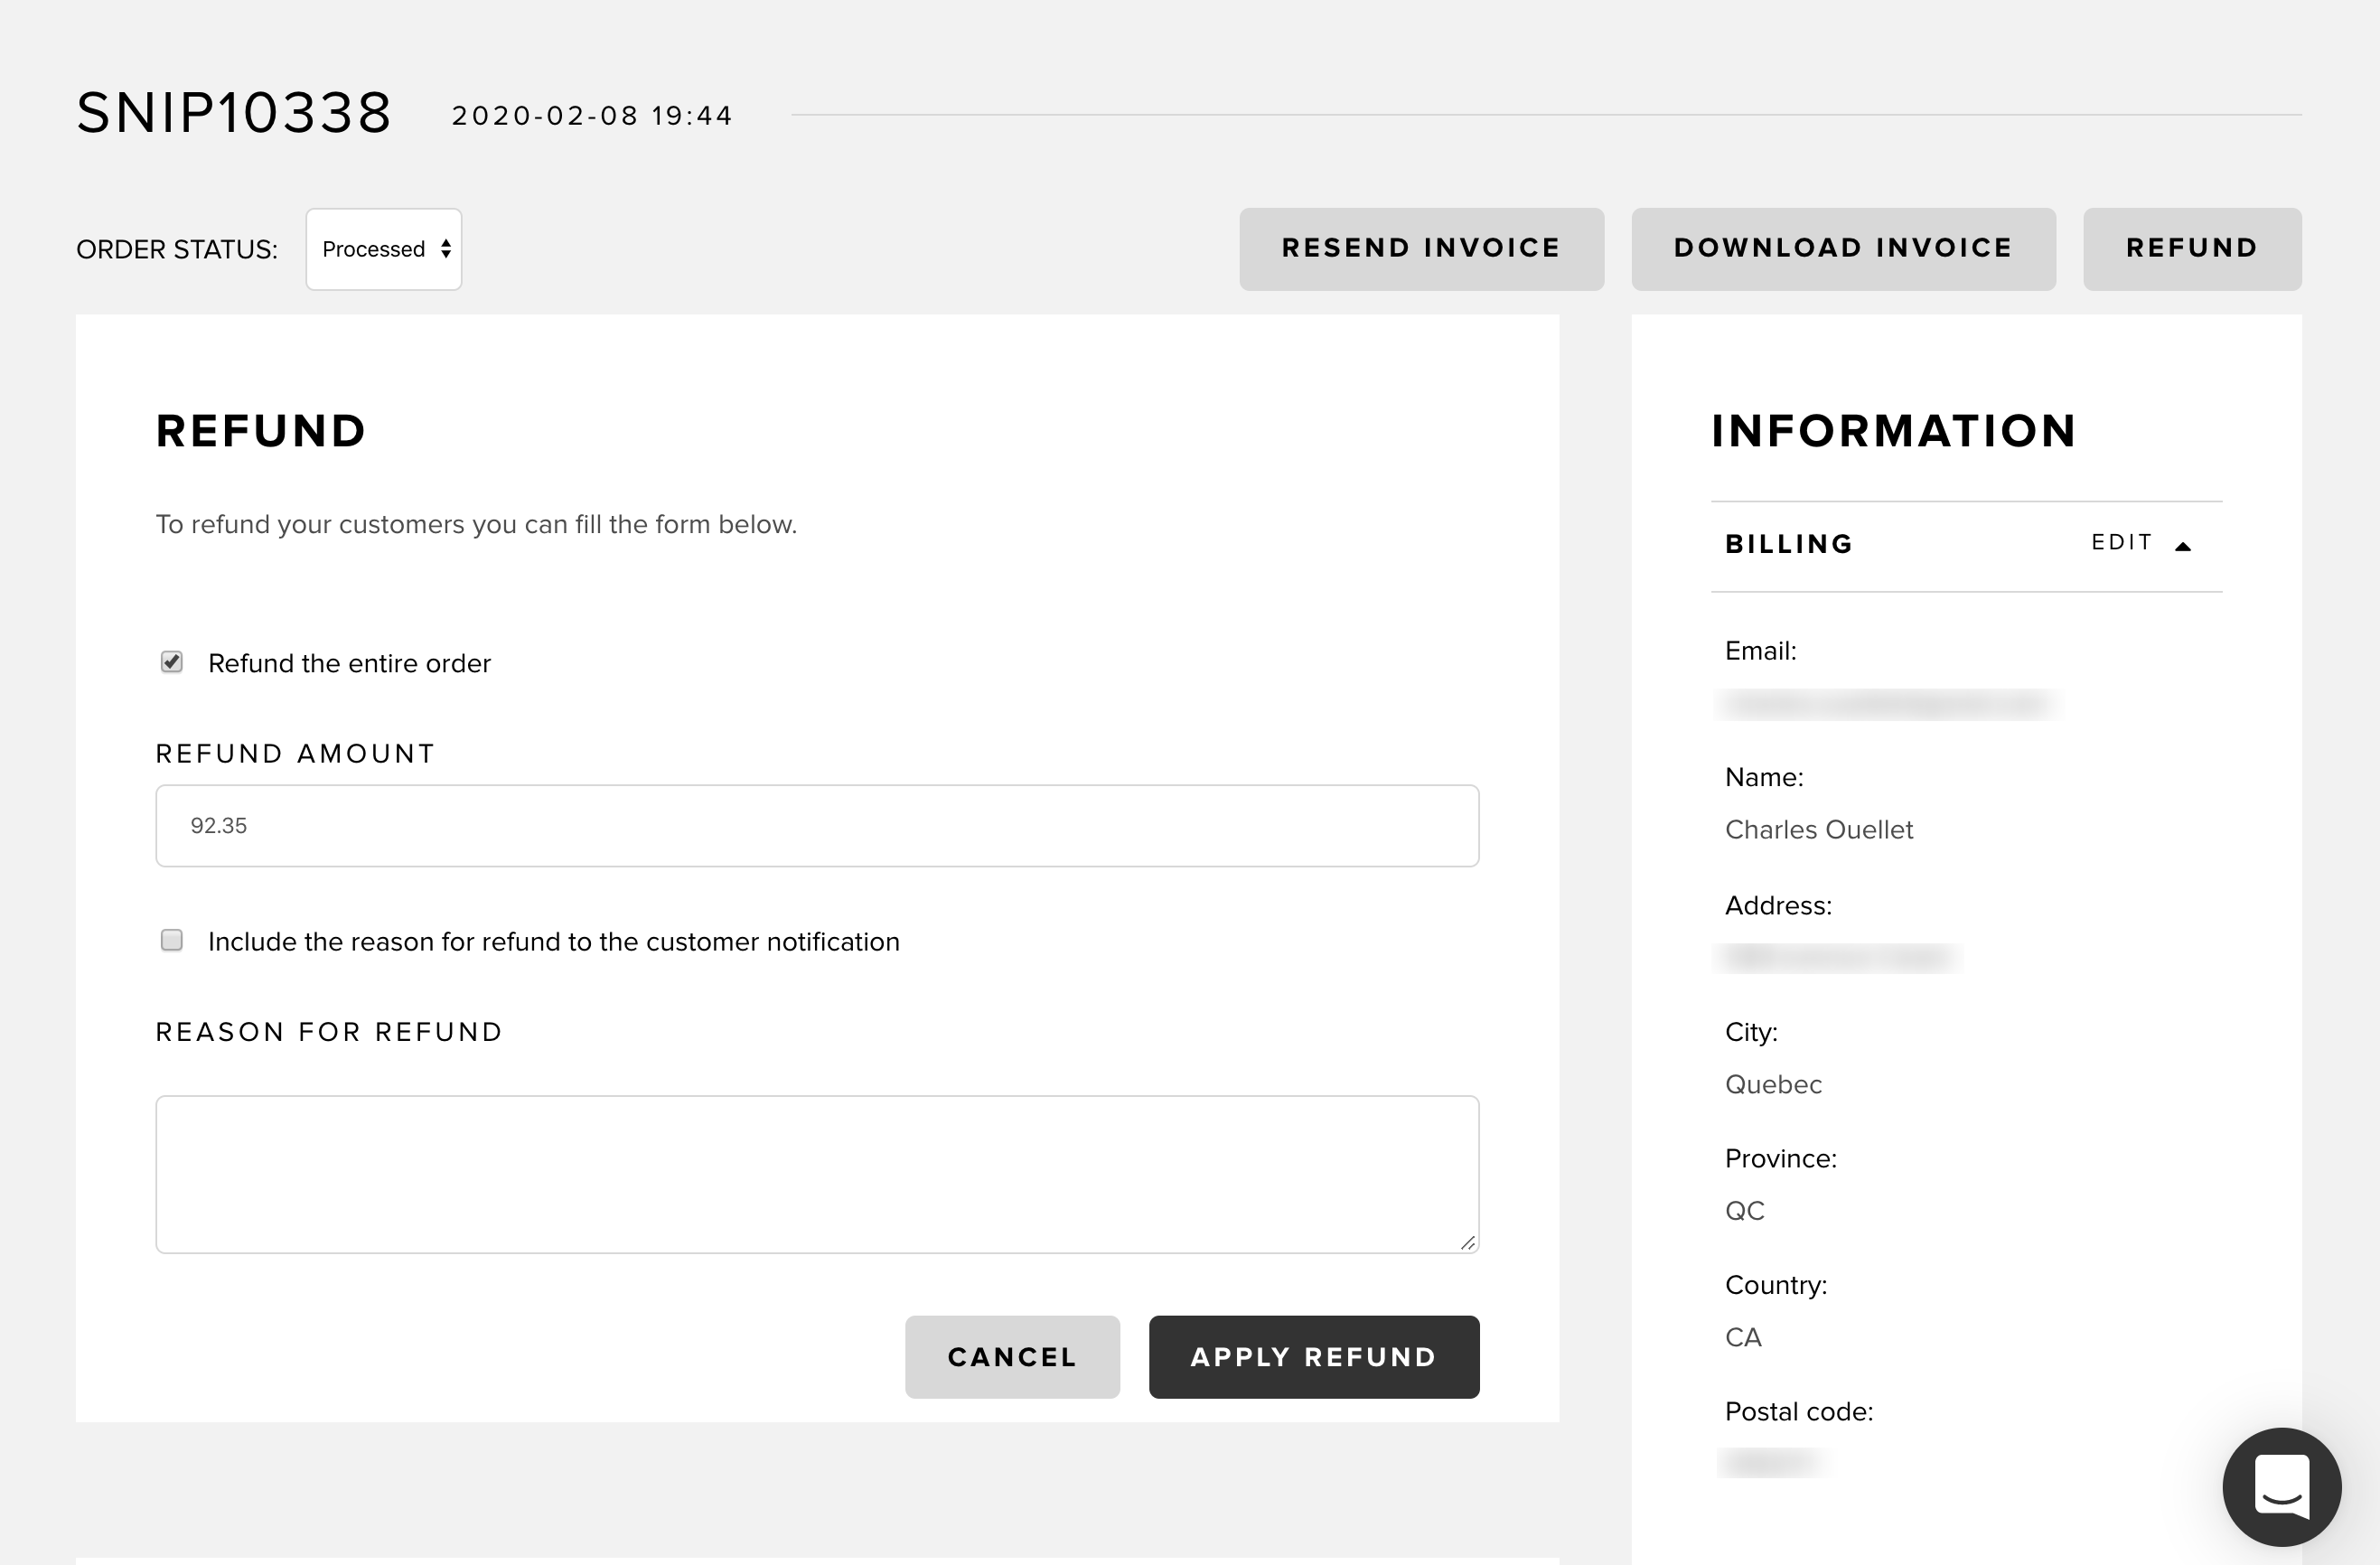
Marking the Refund entire order checkbox will set the refund amount to the total order amount.
If you want to do a partial refund, enter the refund amount in the Refund amount field. A few notes for this field:
- The amount will be rounded to a maximum of two decimals.
- The amount must be a positive decimal number.
- The amount must be lesser than the total of the order.
The Reason for refund field is not mandatory, and will not be shown to your customers on their email refund receipt. If you want your customer to be informed of the refund reason, mark the checkbox above this field.
Hit the Apply refund button to send the refund back to your customer. Your customer will receive an email notification for the refund.
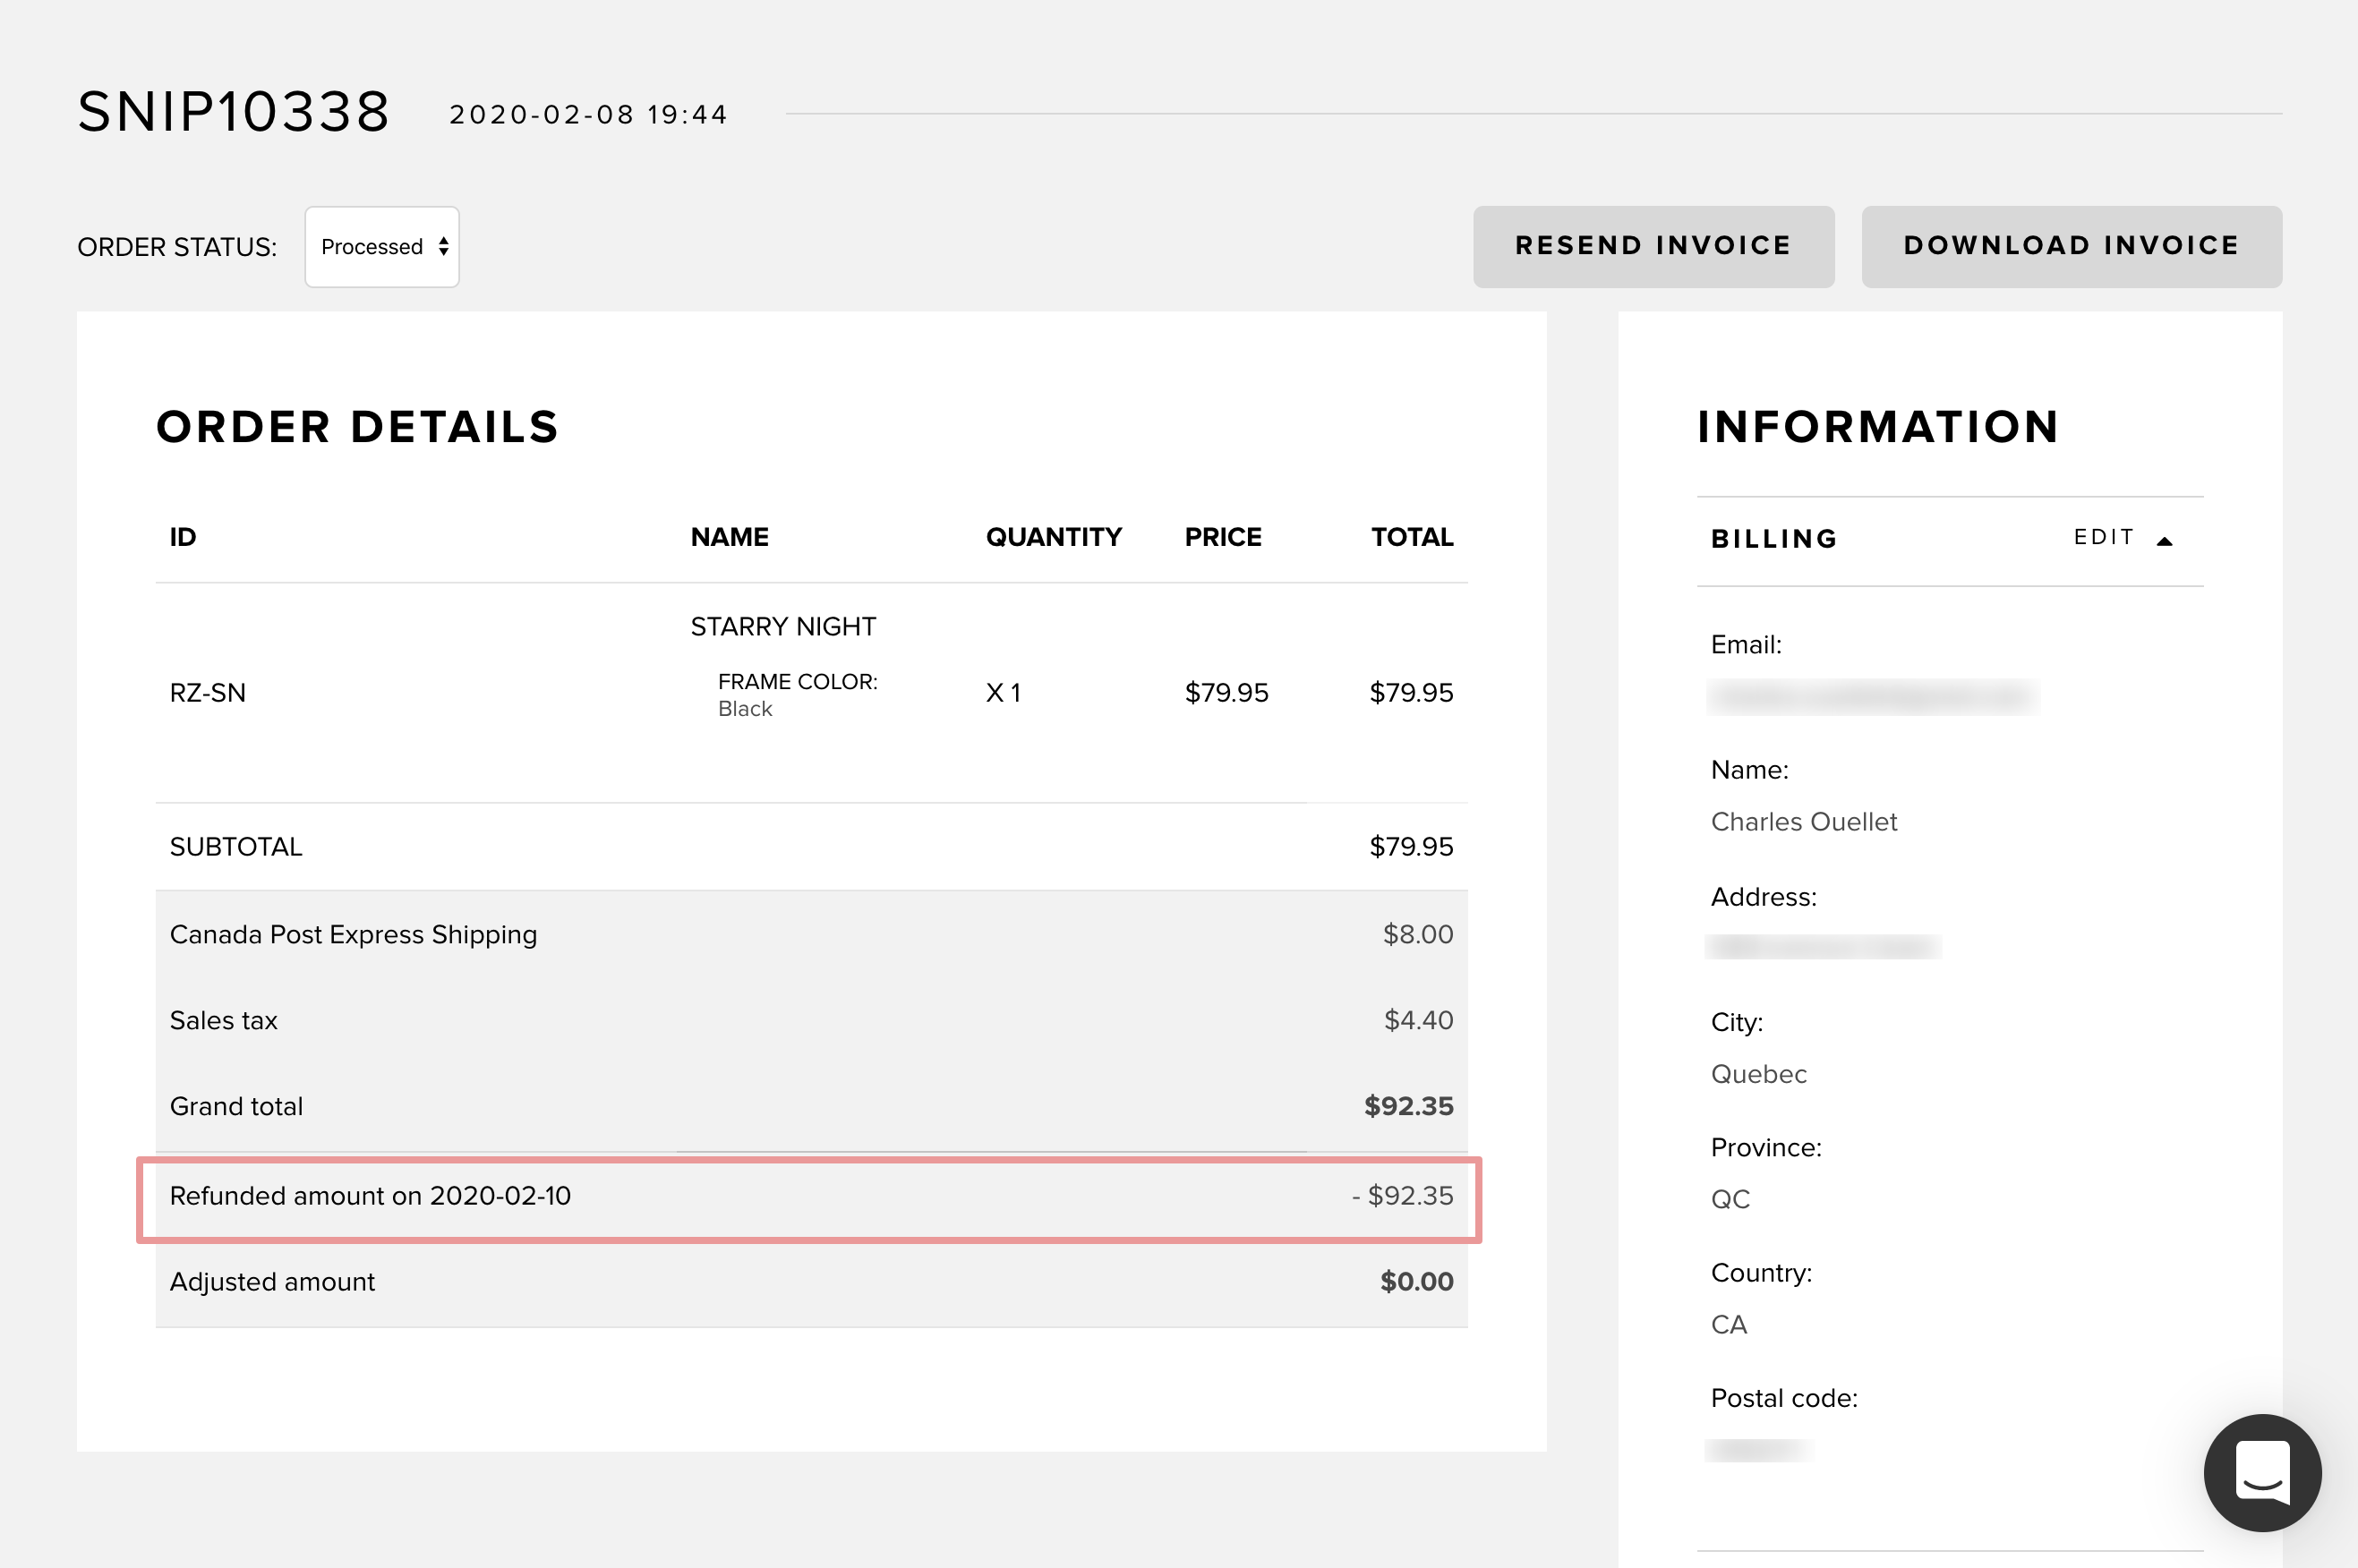
Once a refund has been processed, you'll be able to see it on the order details page:
2.3 Adding sending order tracking number
You can associate a shipping tracking number with a specific order in your dashboard. You can also send emails to your customers to share their order’s tracking number. This way, they’ll be able to follow-up on the shipping process on their own if they want to.
First, you’ll need to change the status of an order to shipped, and add your tracking number or tracking URL:
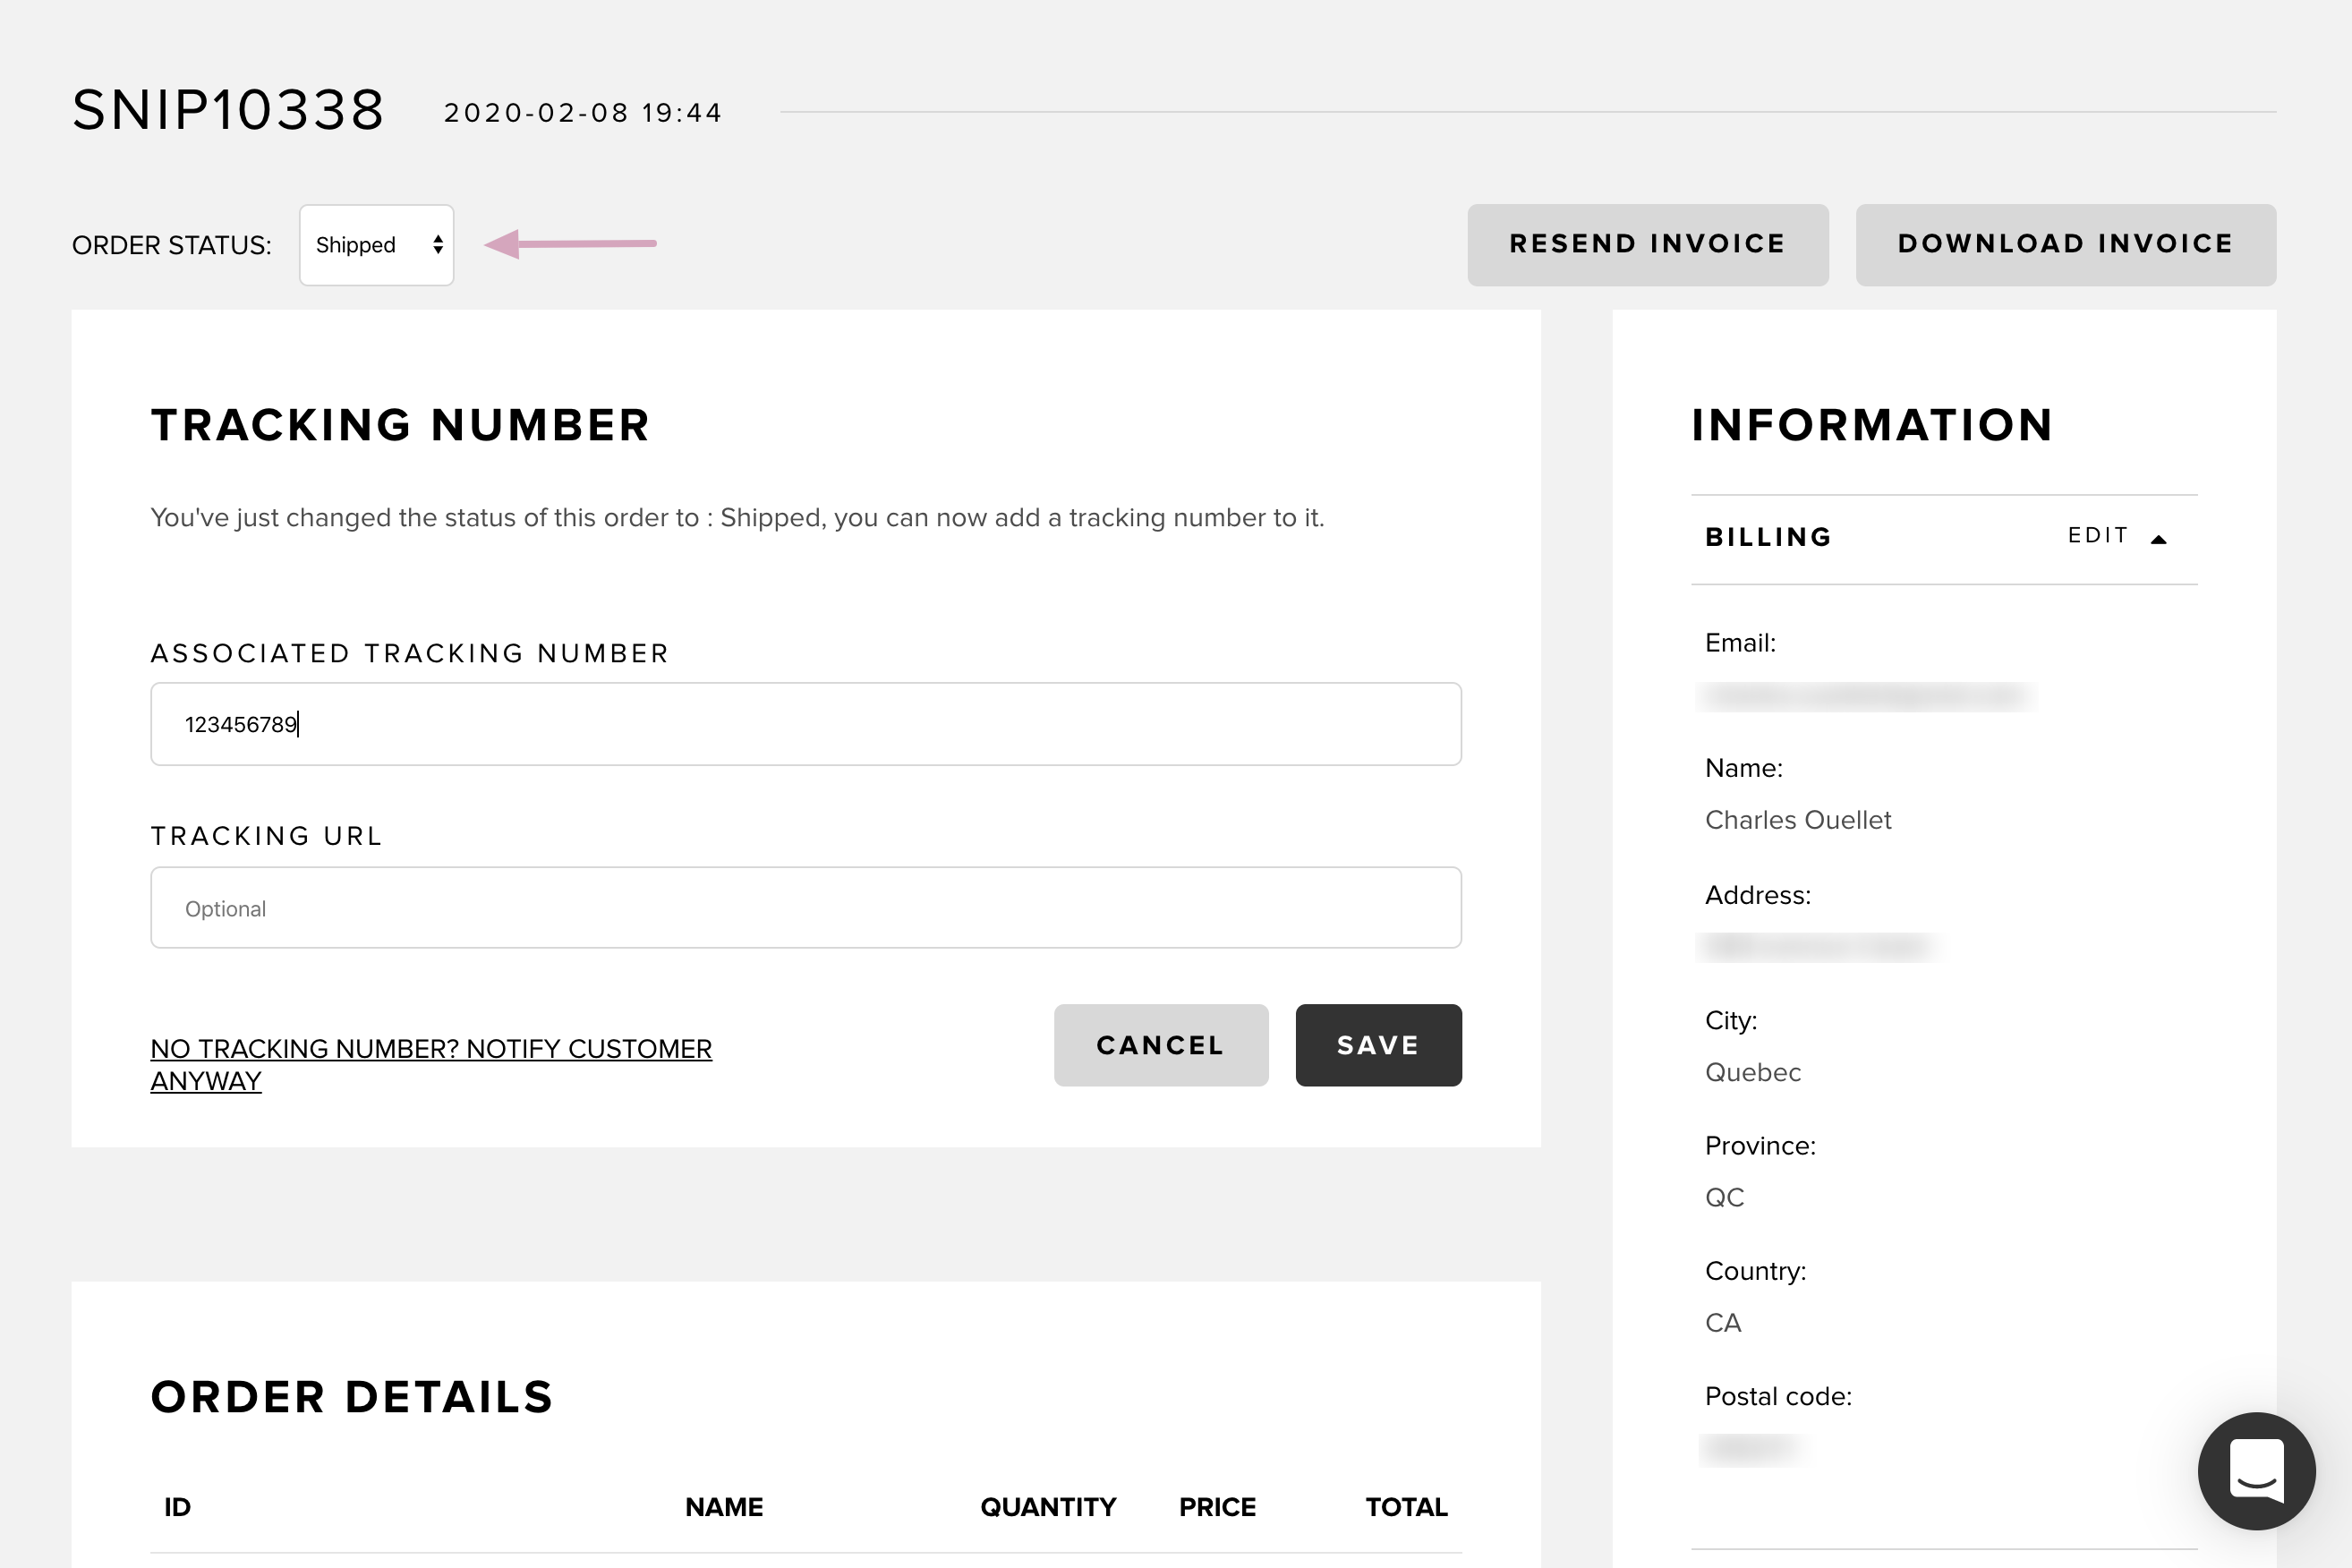
A notice will pop up asking you if you want to send the tracking # to your customer’s email address.
Here’s an example of the email we’ll send:
Clicking the No tracking number? Notify customer anyway link will inform your customer that their order has shipped without sharing a tracking number.
3. Customers
This section contains a full list of all the customers who ordered from your store through Snipcart. You can search it with 4 different filters:
- Status (confirmed, unconfirmed)
- Name
- Date (from and to range)
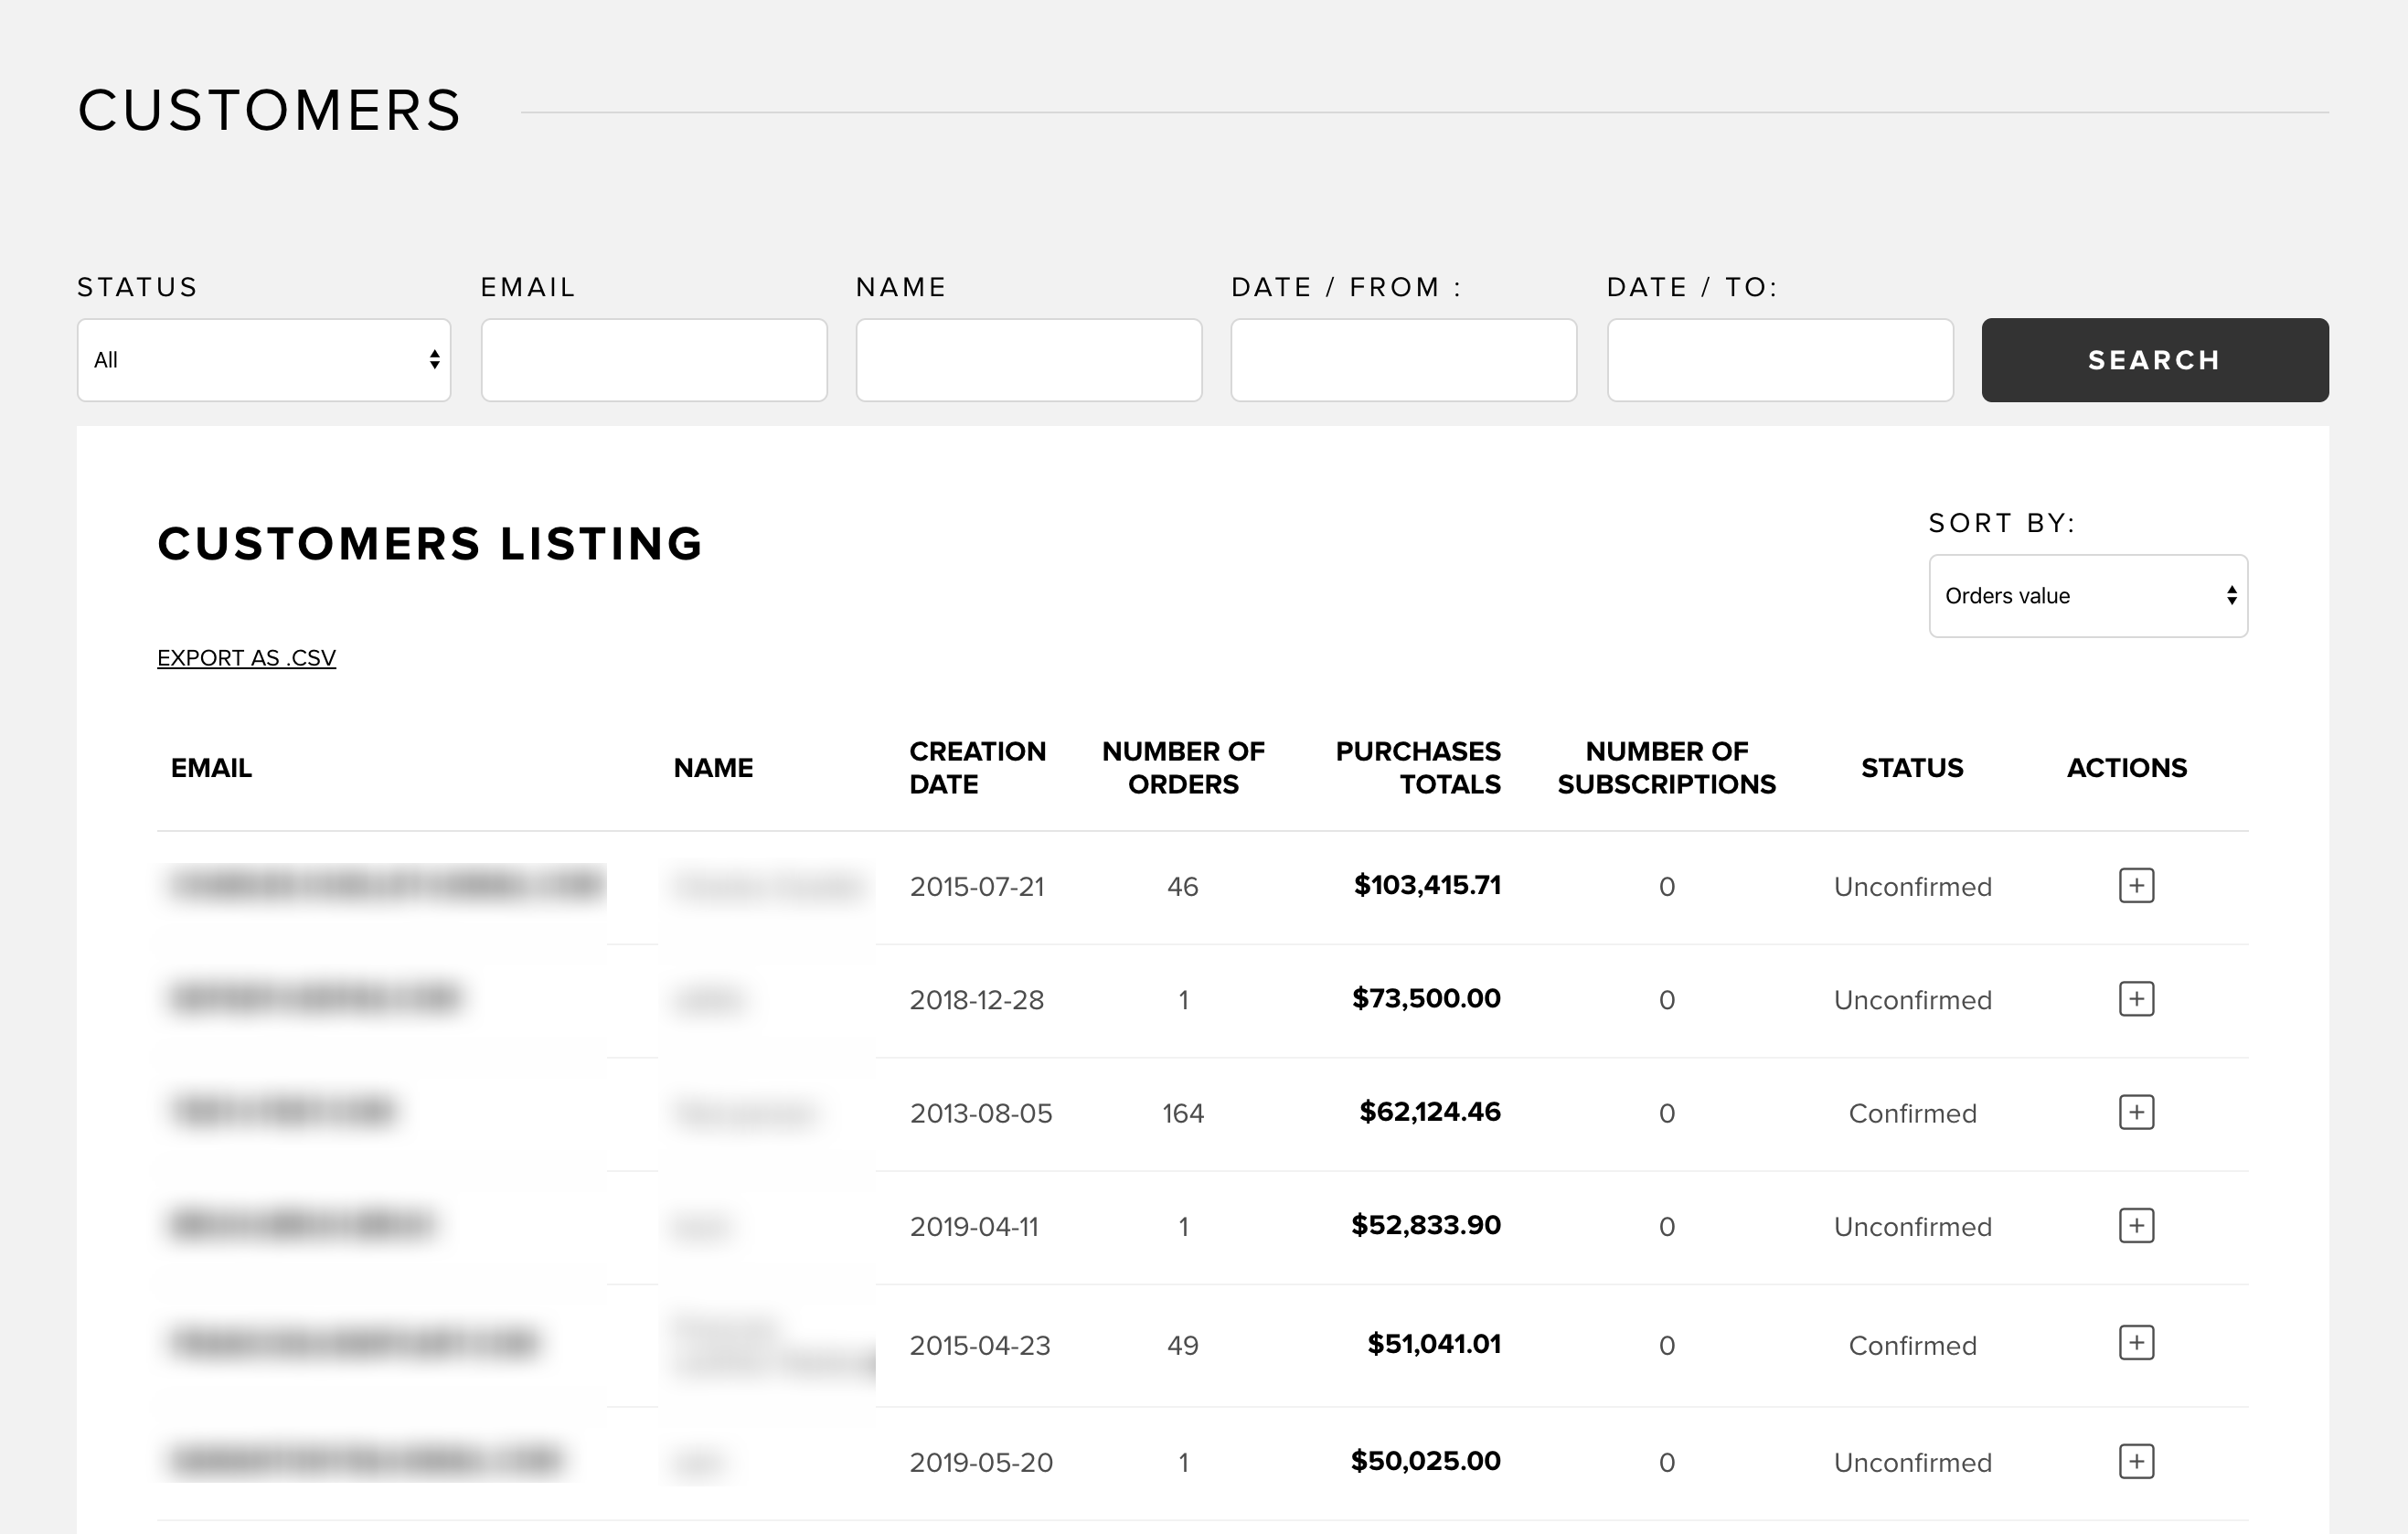
Customer status
- Confirmed customers are the ones who have created an account through Snipcart on your site.
- Unconfirmed customers are the ones who have no Snipcart accounts on your site, and have checked out as guests.
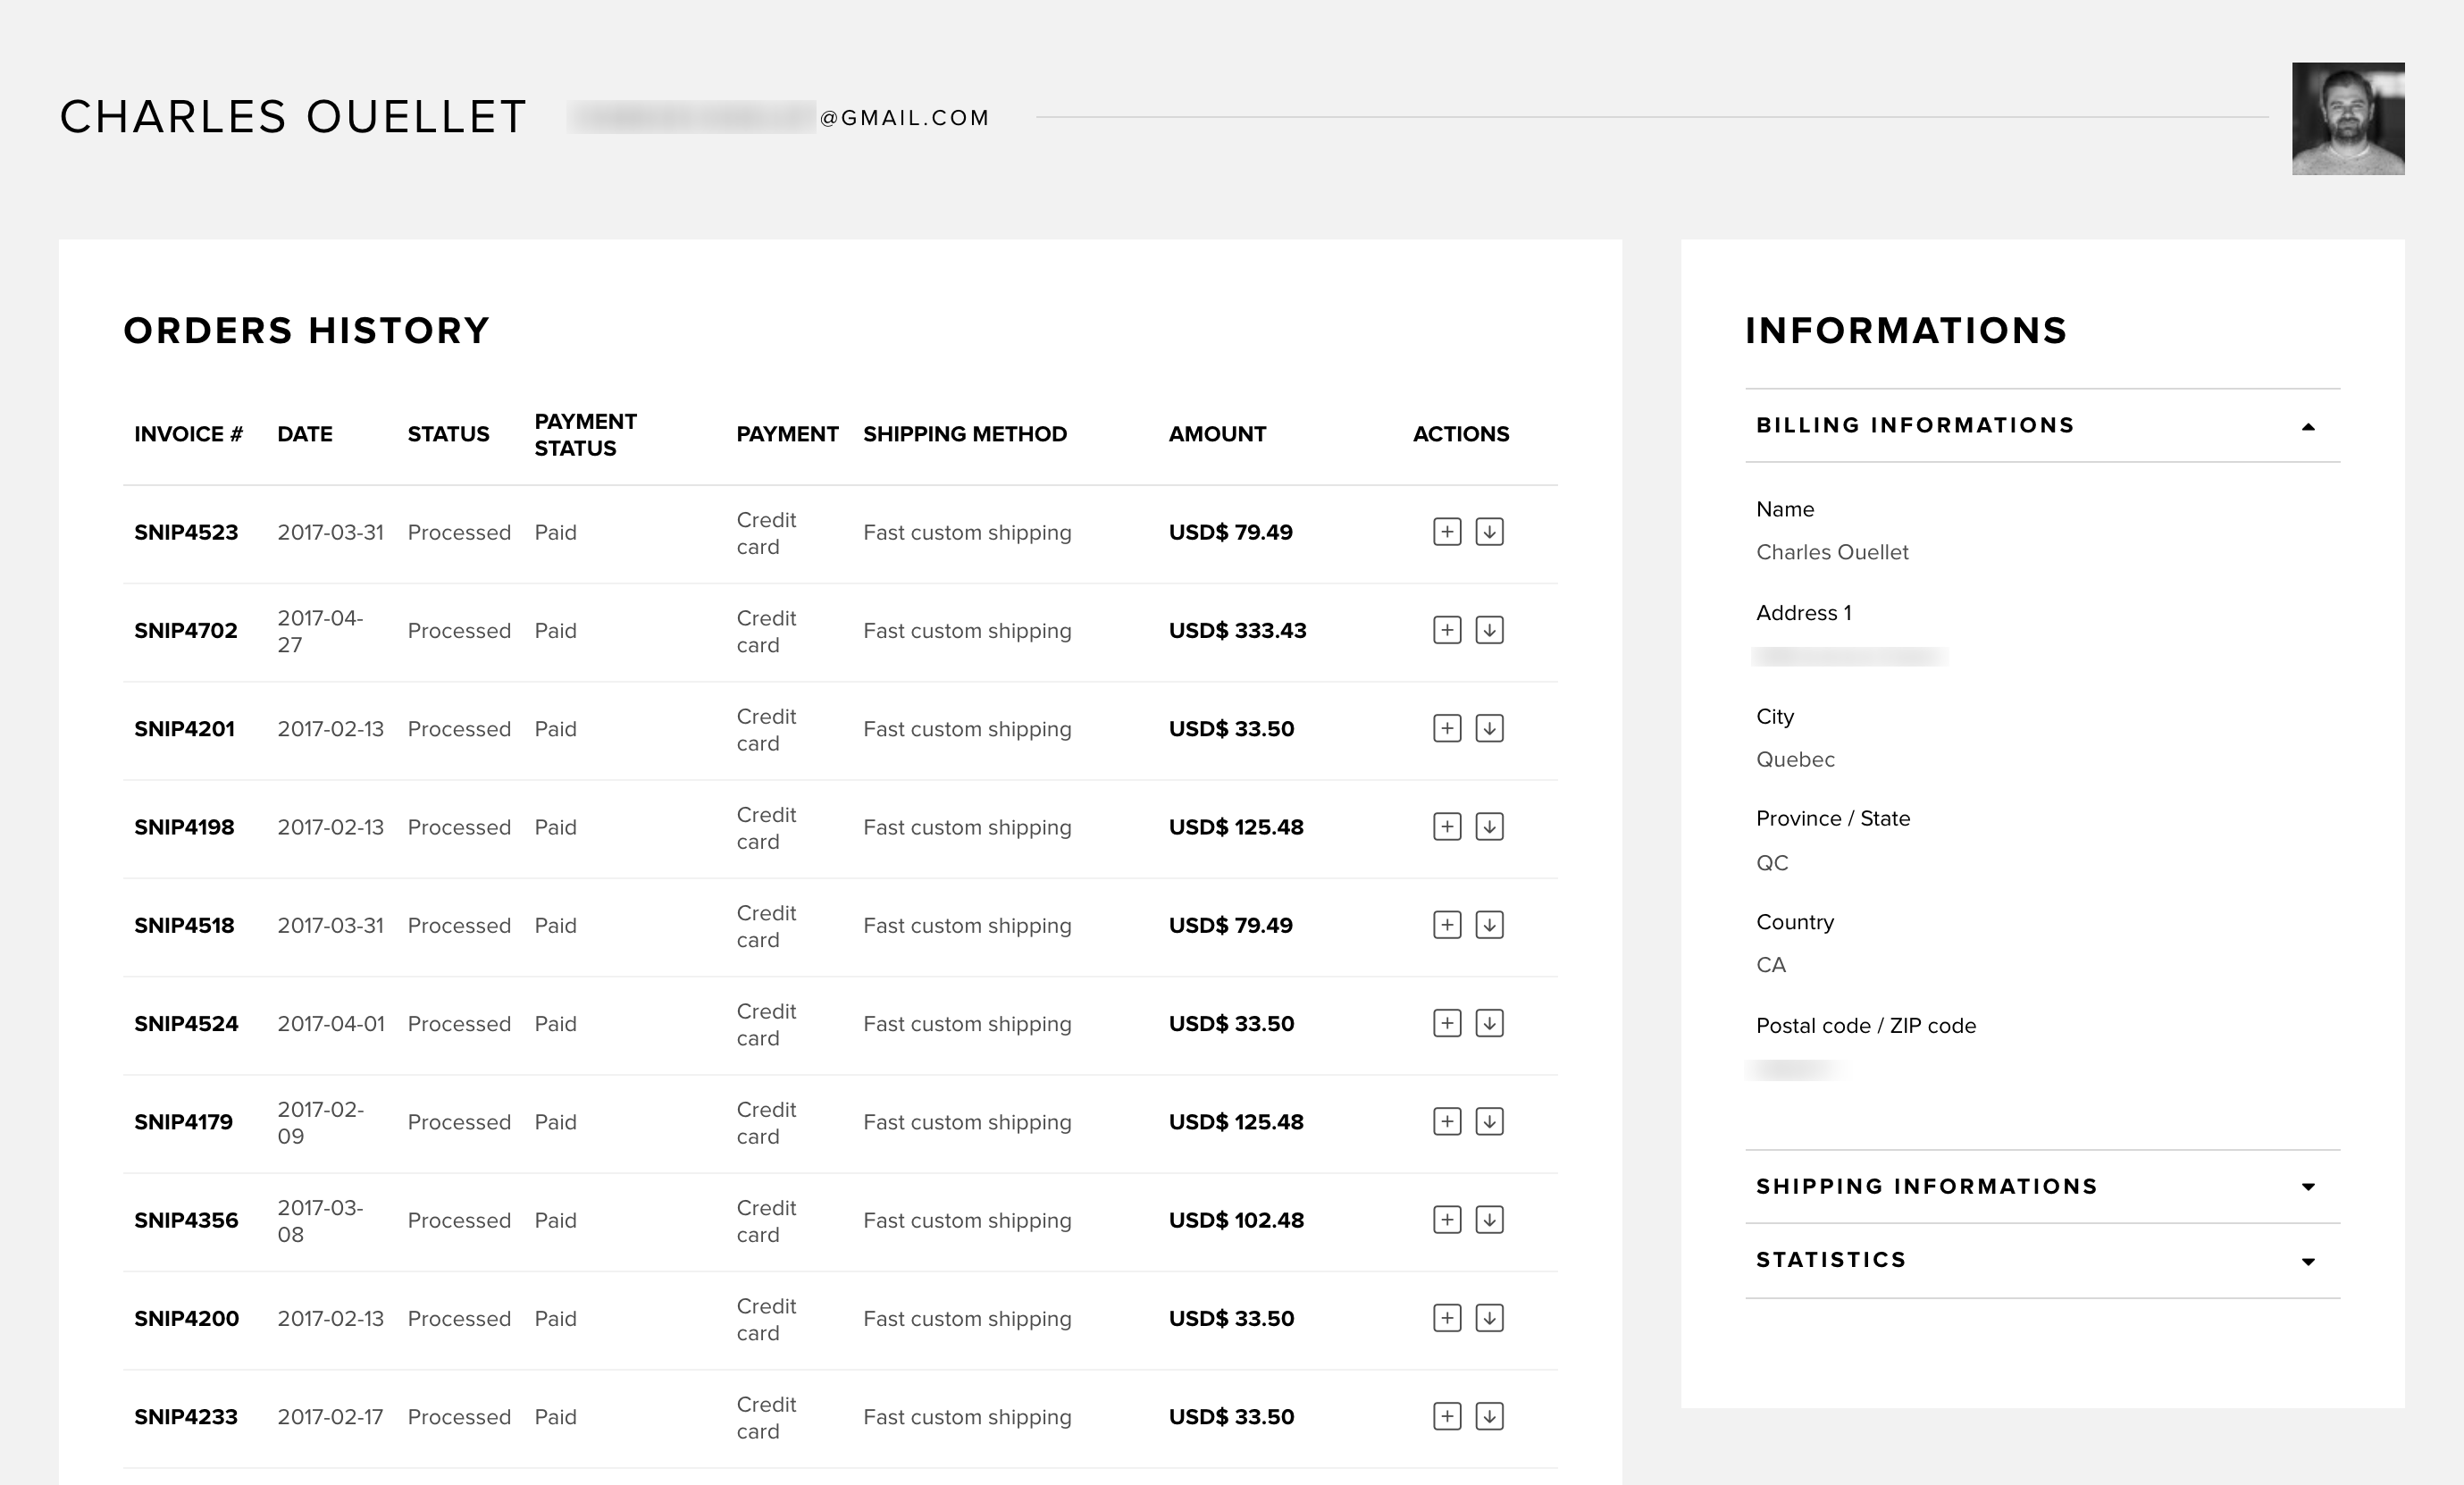
3.1 Customer details
By clicking on a customer's email in your customer list, you'll access their details page. From there, you can find a list of your customer's past orders. Customer billing, payment and shipping information is also available.
You can use the + sign to see order details and the ↓ sign to download the invoice.
4. Discounts
This section is where you can create, edit and delete discounts for your store.
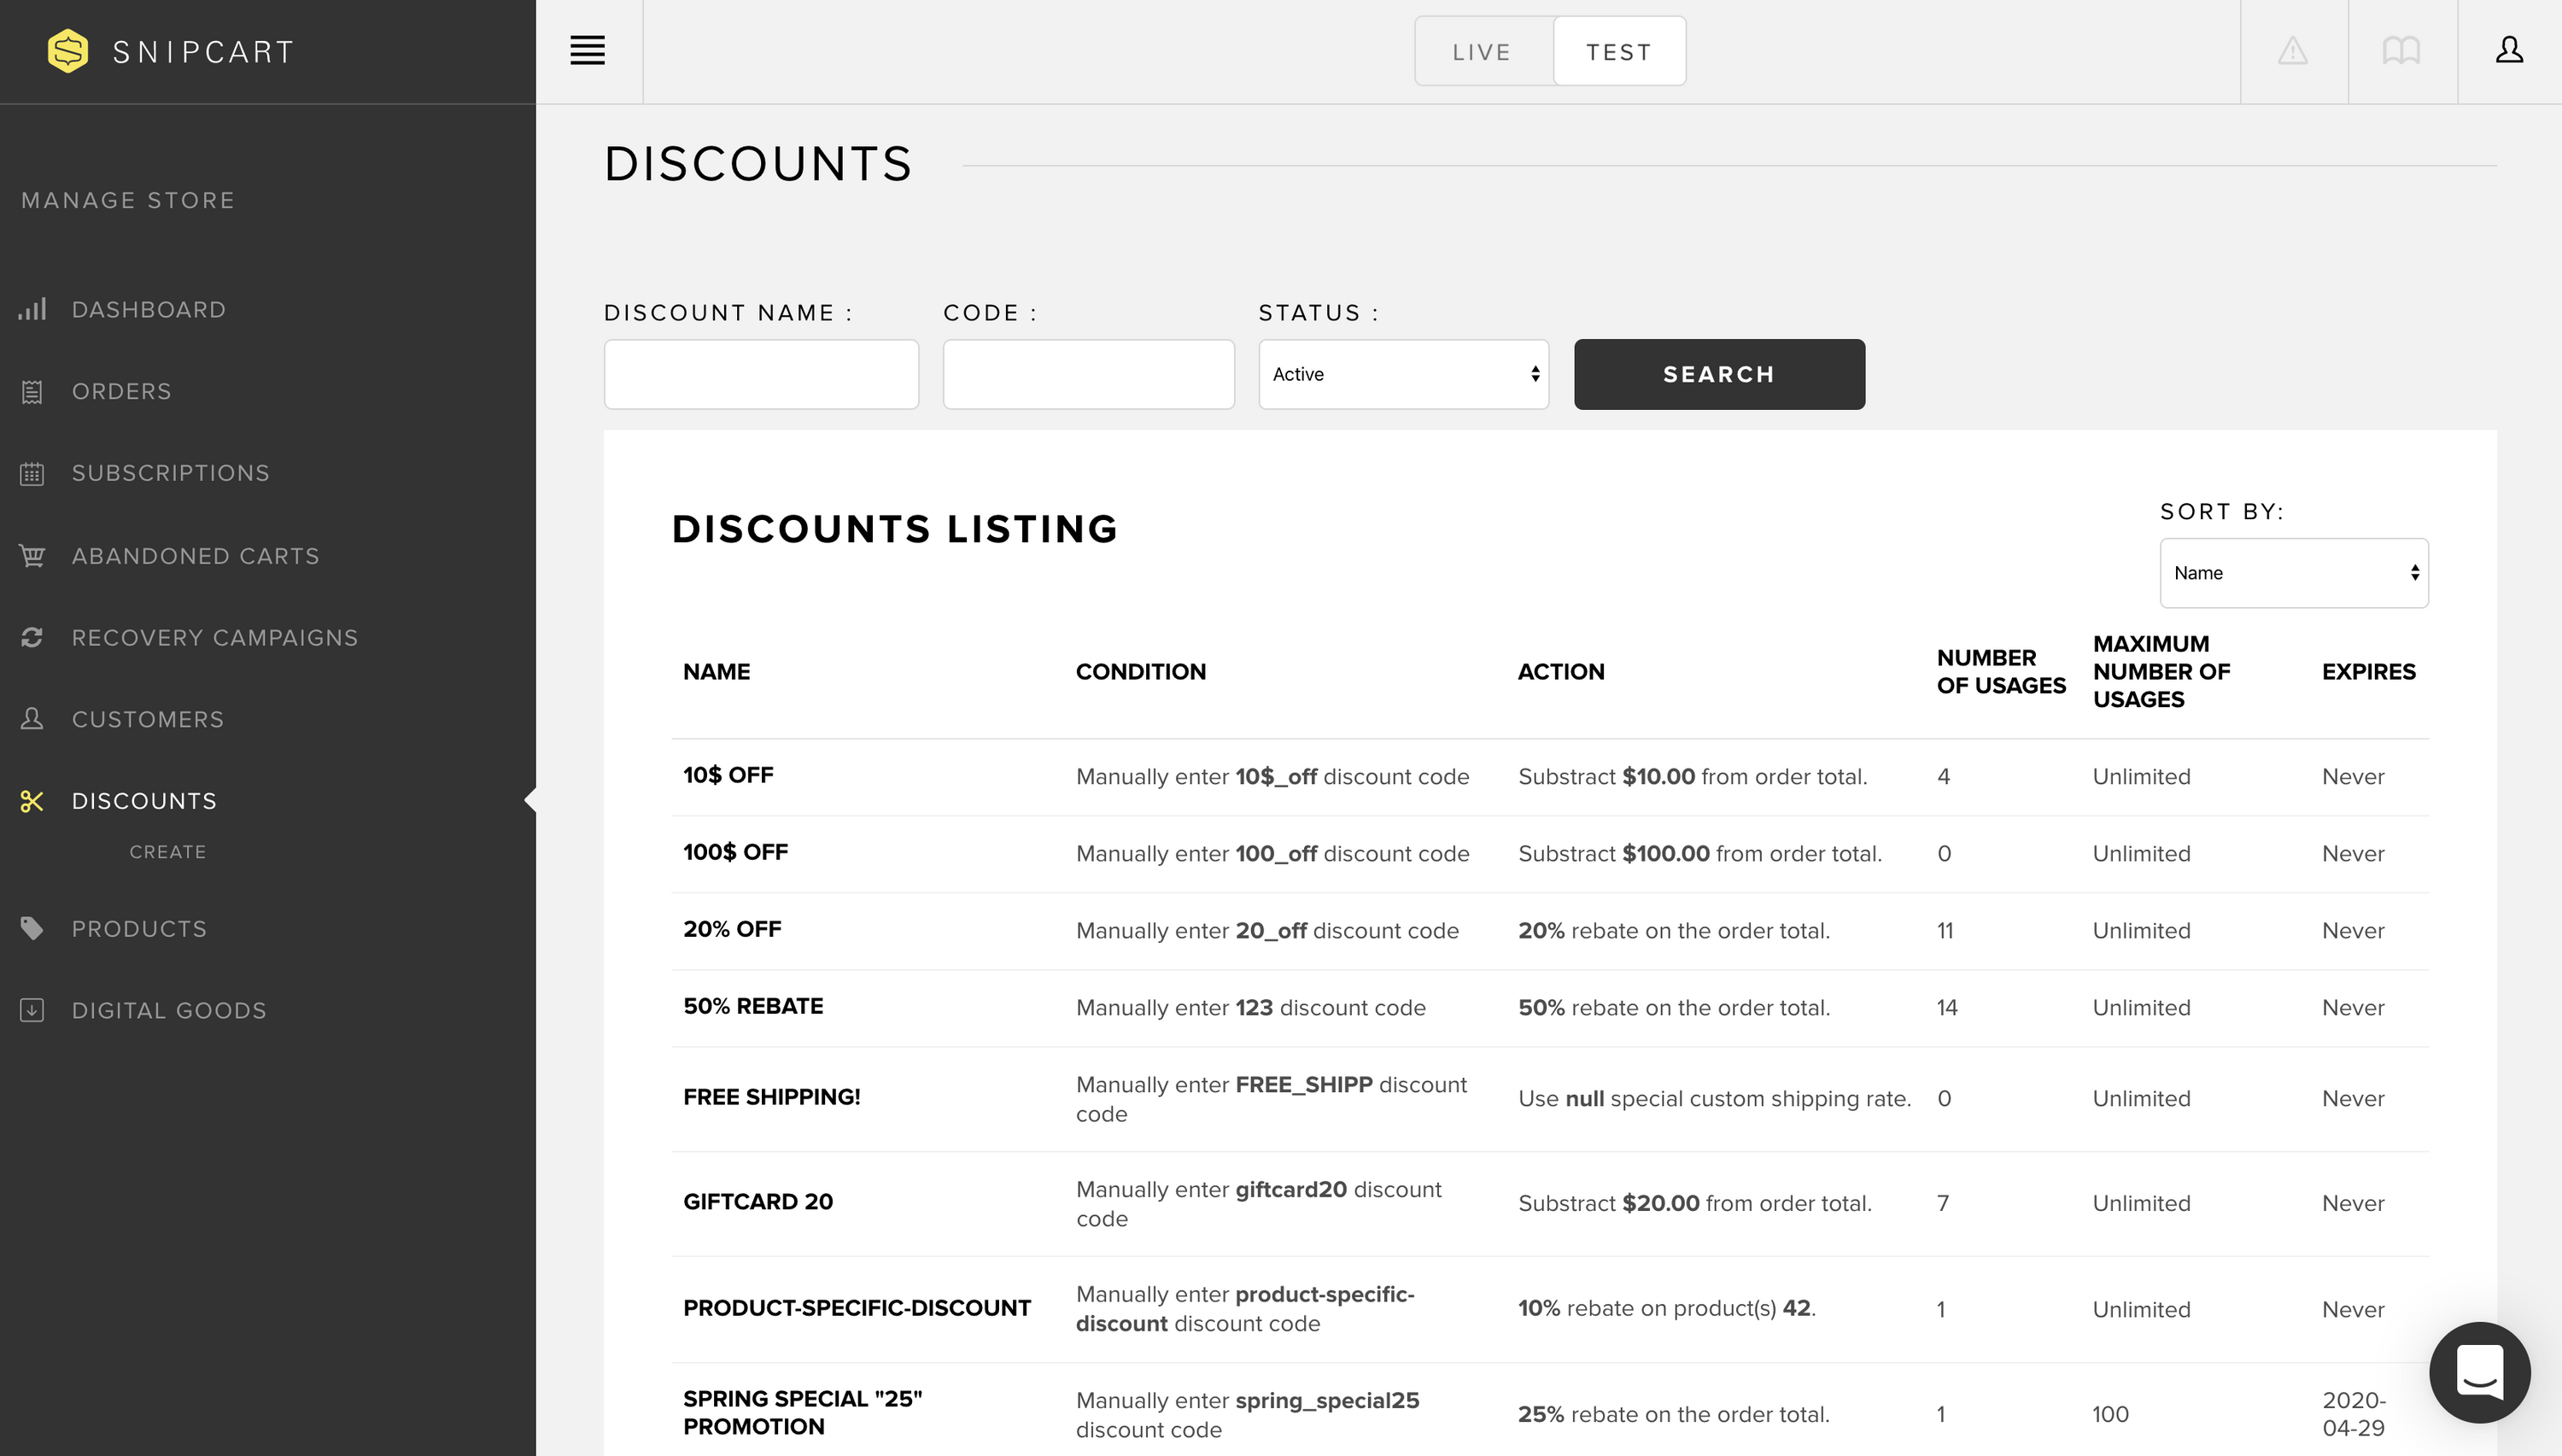
To learn how to configure discounts with Snipcart, read this entry.
5. Products
This section displays your store's products. From there, you can gain insights on sales and bestsellers.
Products will appear on this page once they've been added to the cart by a customer. If you notice that a product is not listed, it might be because it was never added in-cart by anyone yet.
This section also allows you to manage inventory.
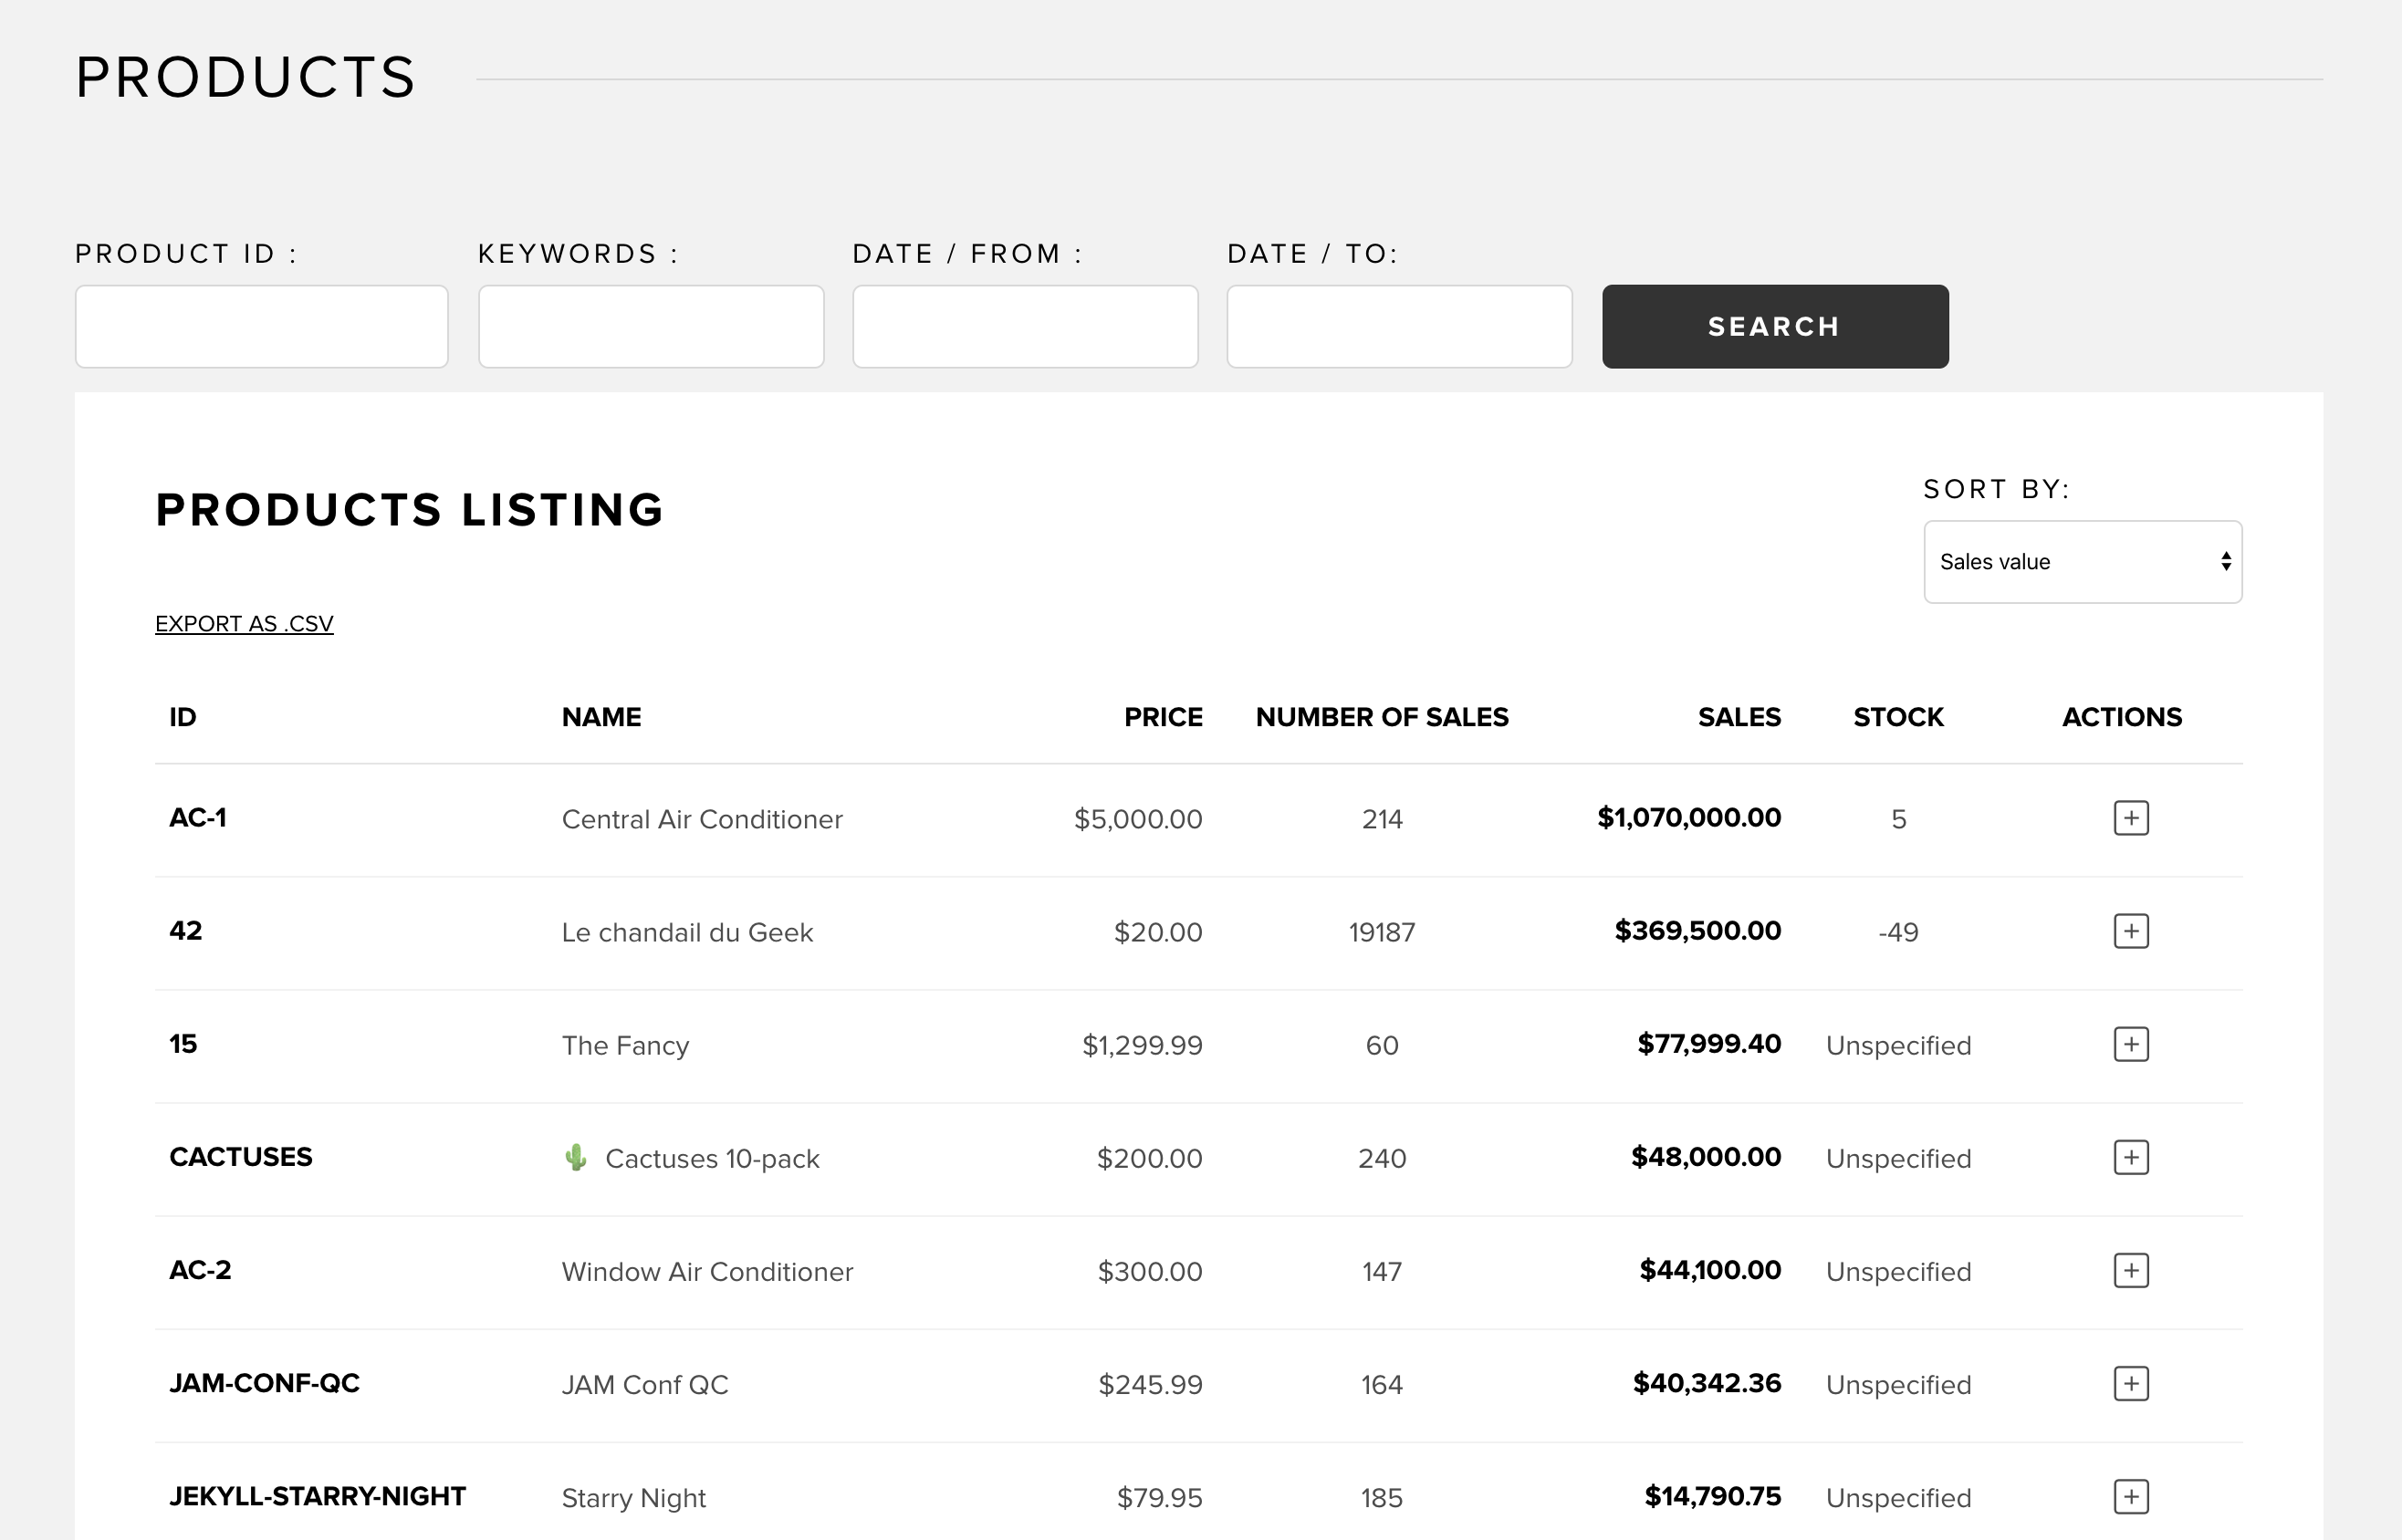
Each time a product is added or an order is completed, the corresponding numbers will get updated automatically.
5.1 Product details
By clicking on the individual ID of a product, you'll access the product details section. There, you'll see:
- Product stock available [if inventory management enabled]
- 10 last orders containing product
- 10 last abandoned carts containing product
- Number of times product was sold
- Total sales product generated
- Product attributes
- Product custom fields
5.2 Inventory management
Note: to use this feature, you first need to activate it in the Store configurations section.
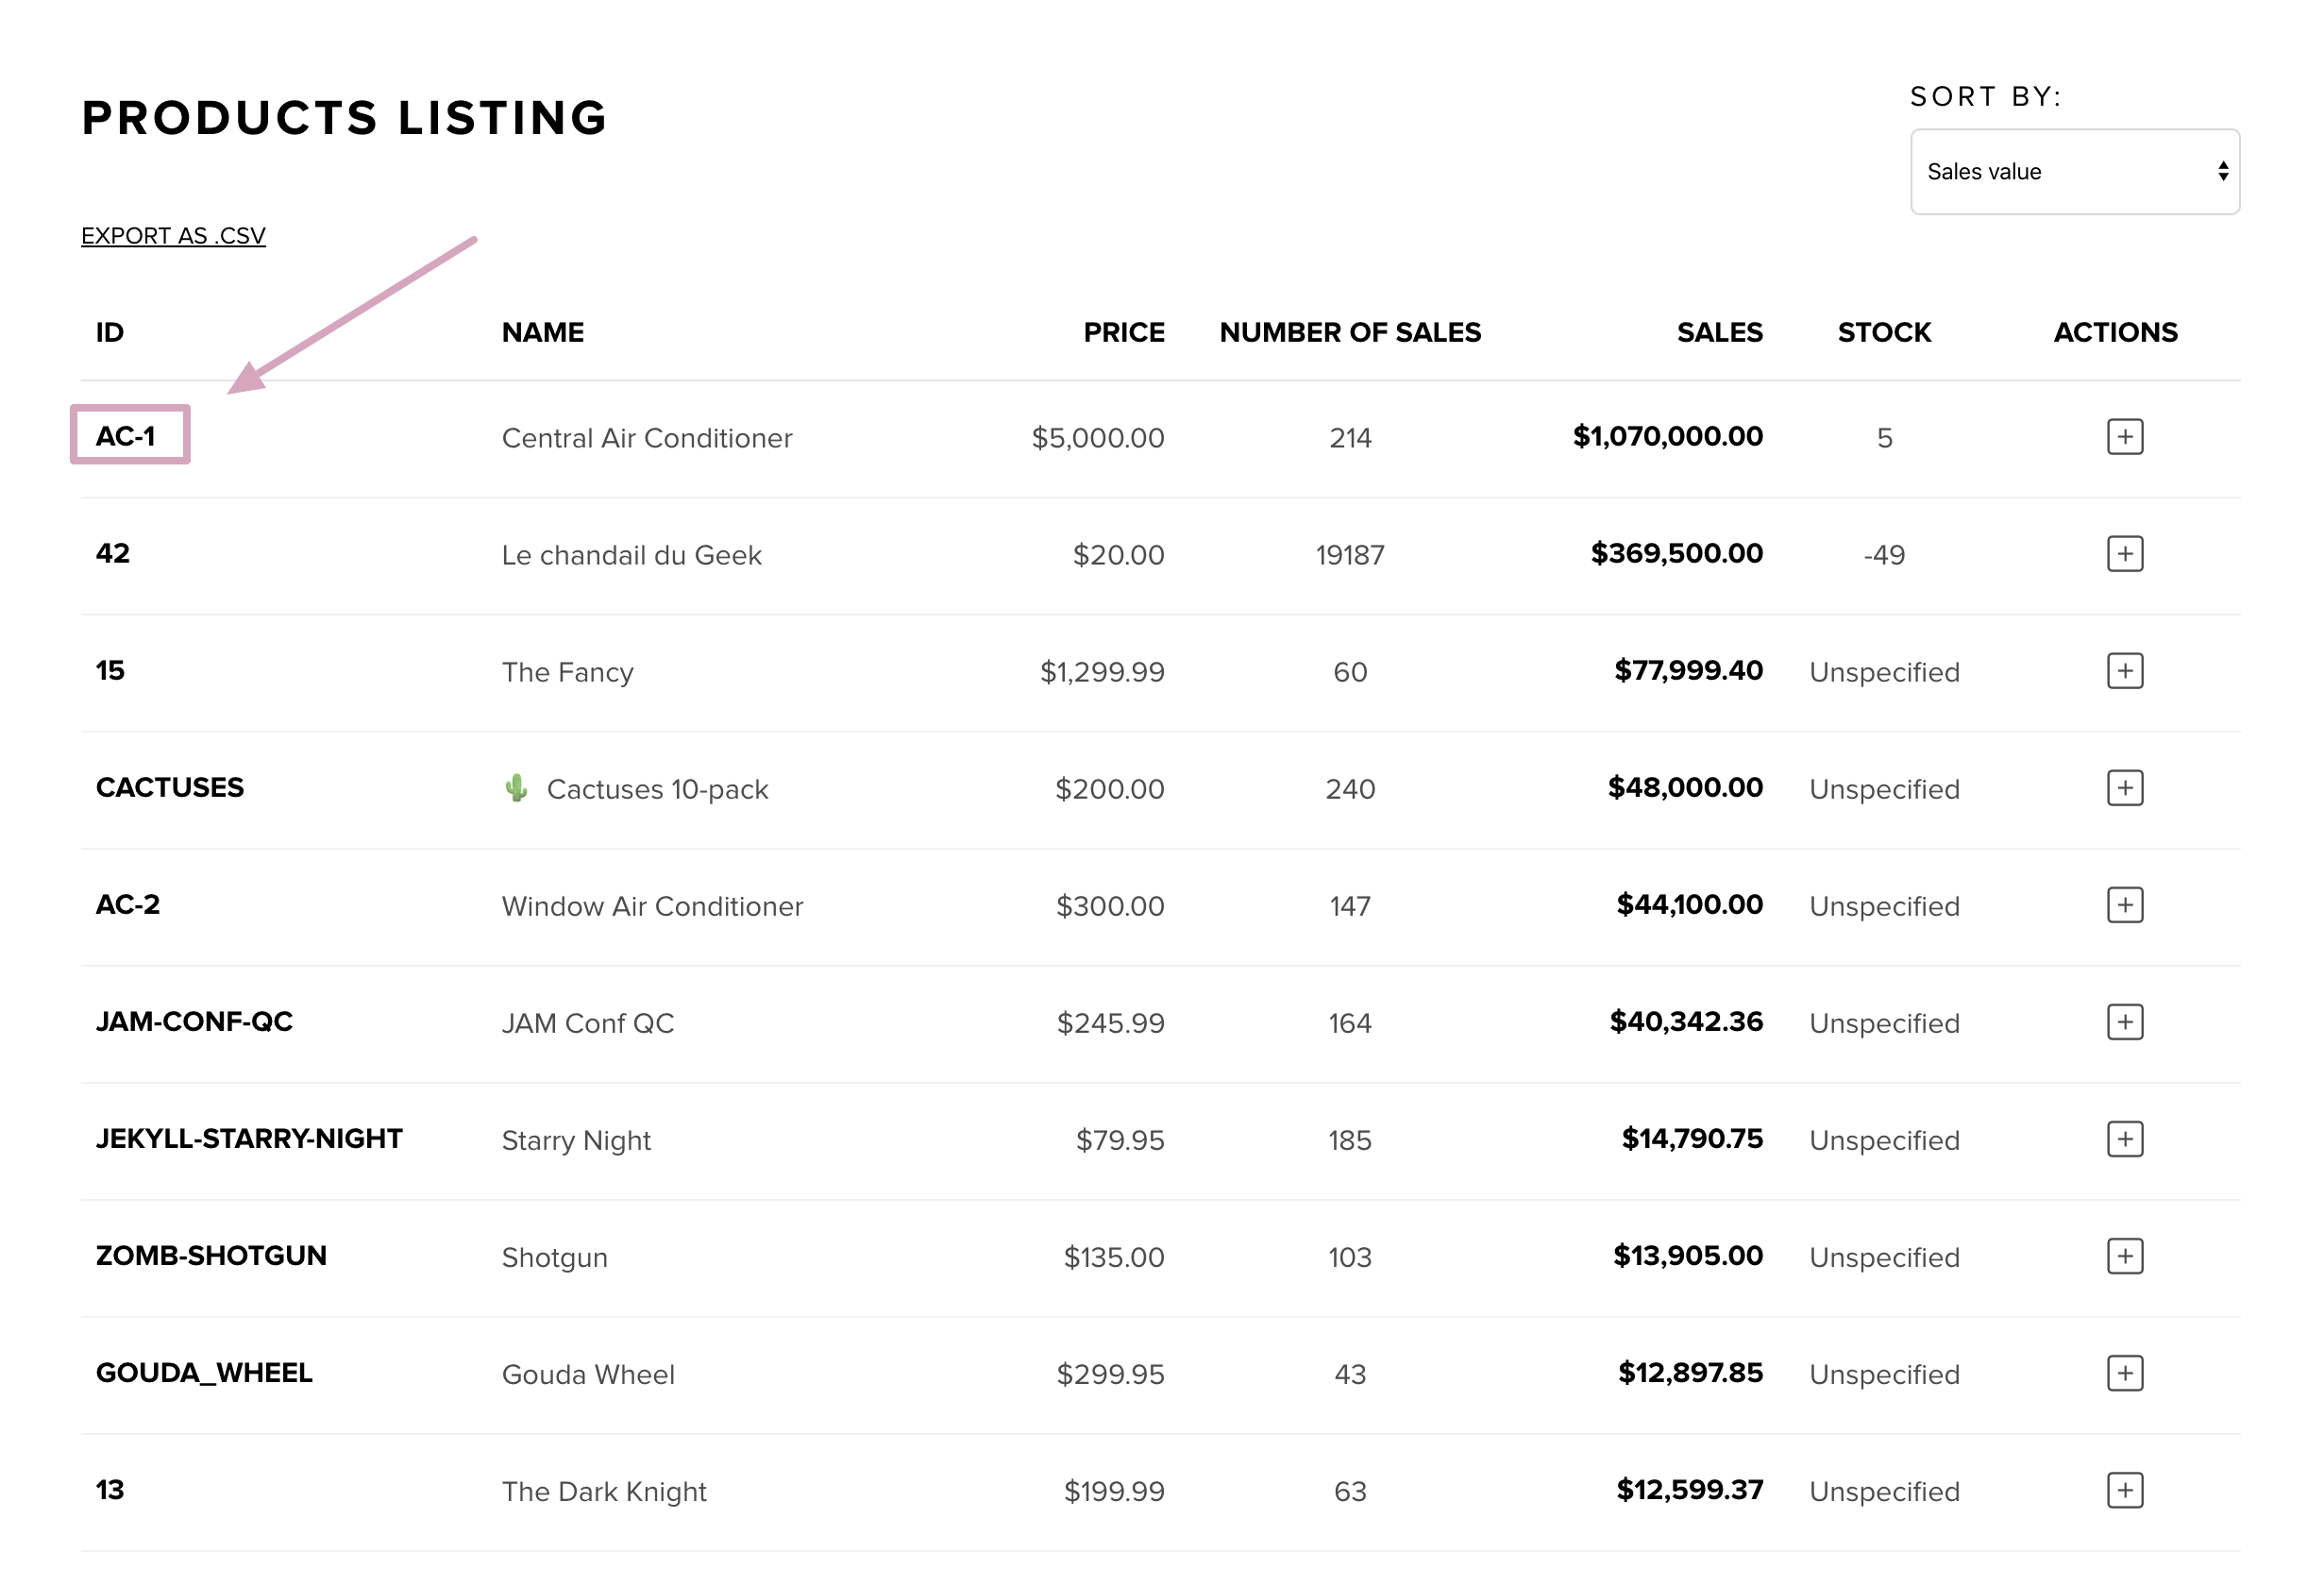
To manage your inventory, you'll have to select a product details page. Click on a product's ID to do so:
From there, the first interactive grid you'll see is the Inventory management zone. You can choose to manage inventory for your product as a whole, or for your product's different options (e.g. custom fields).
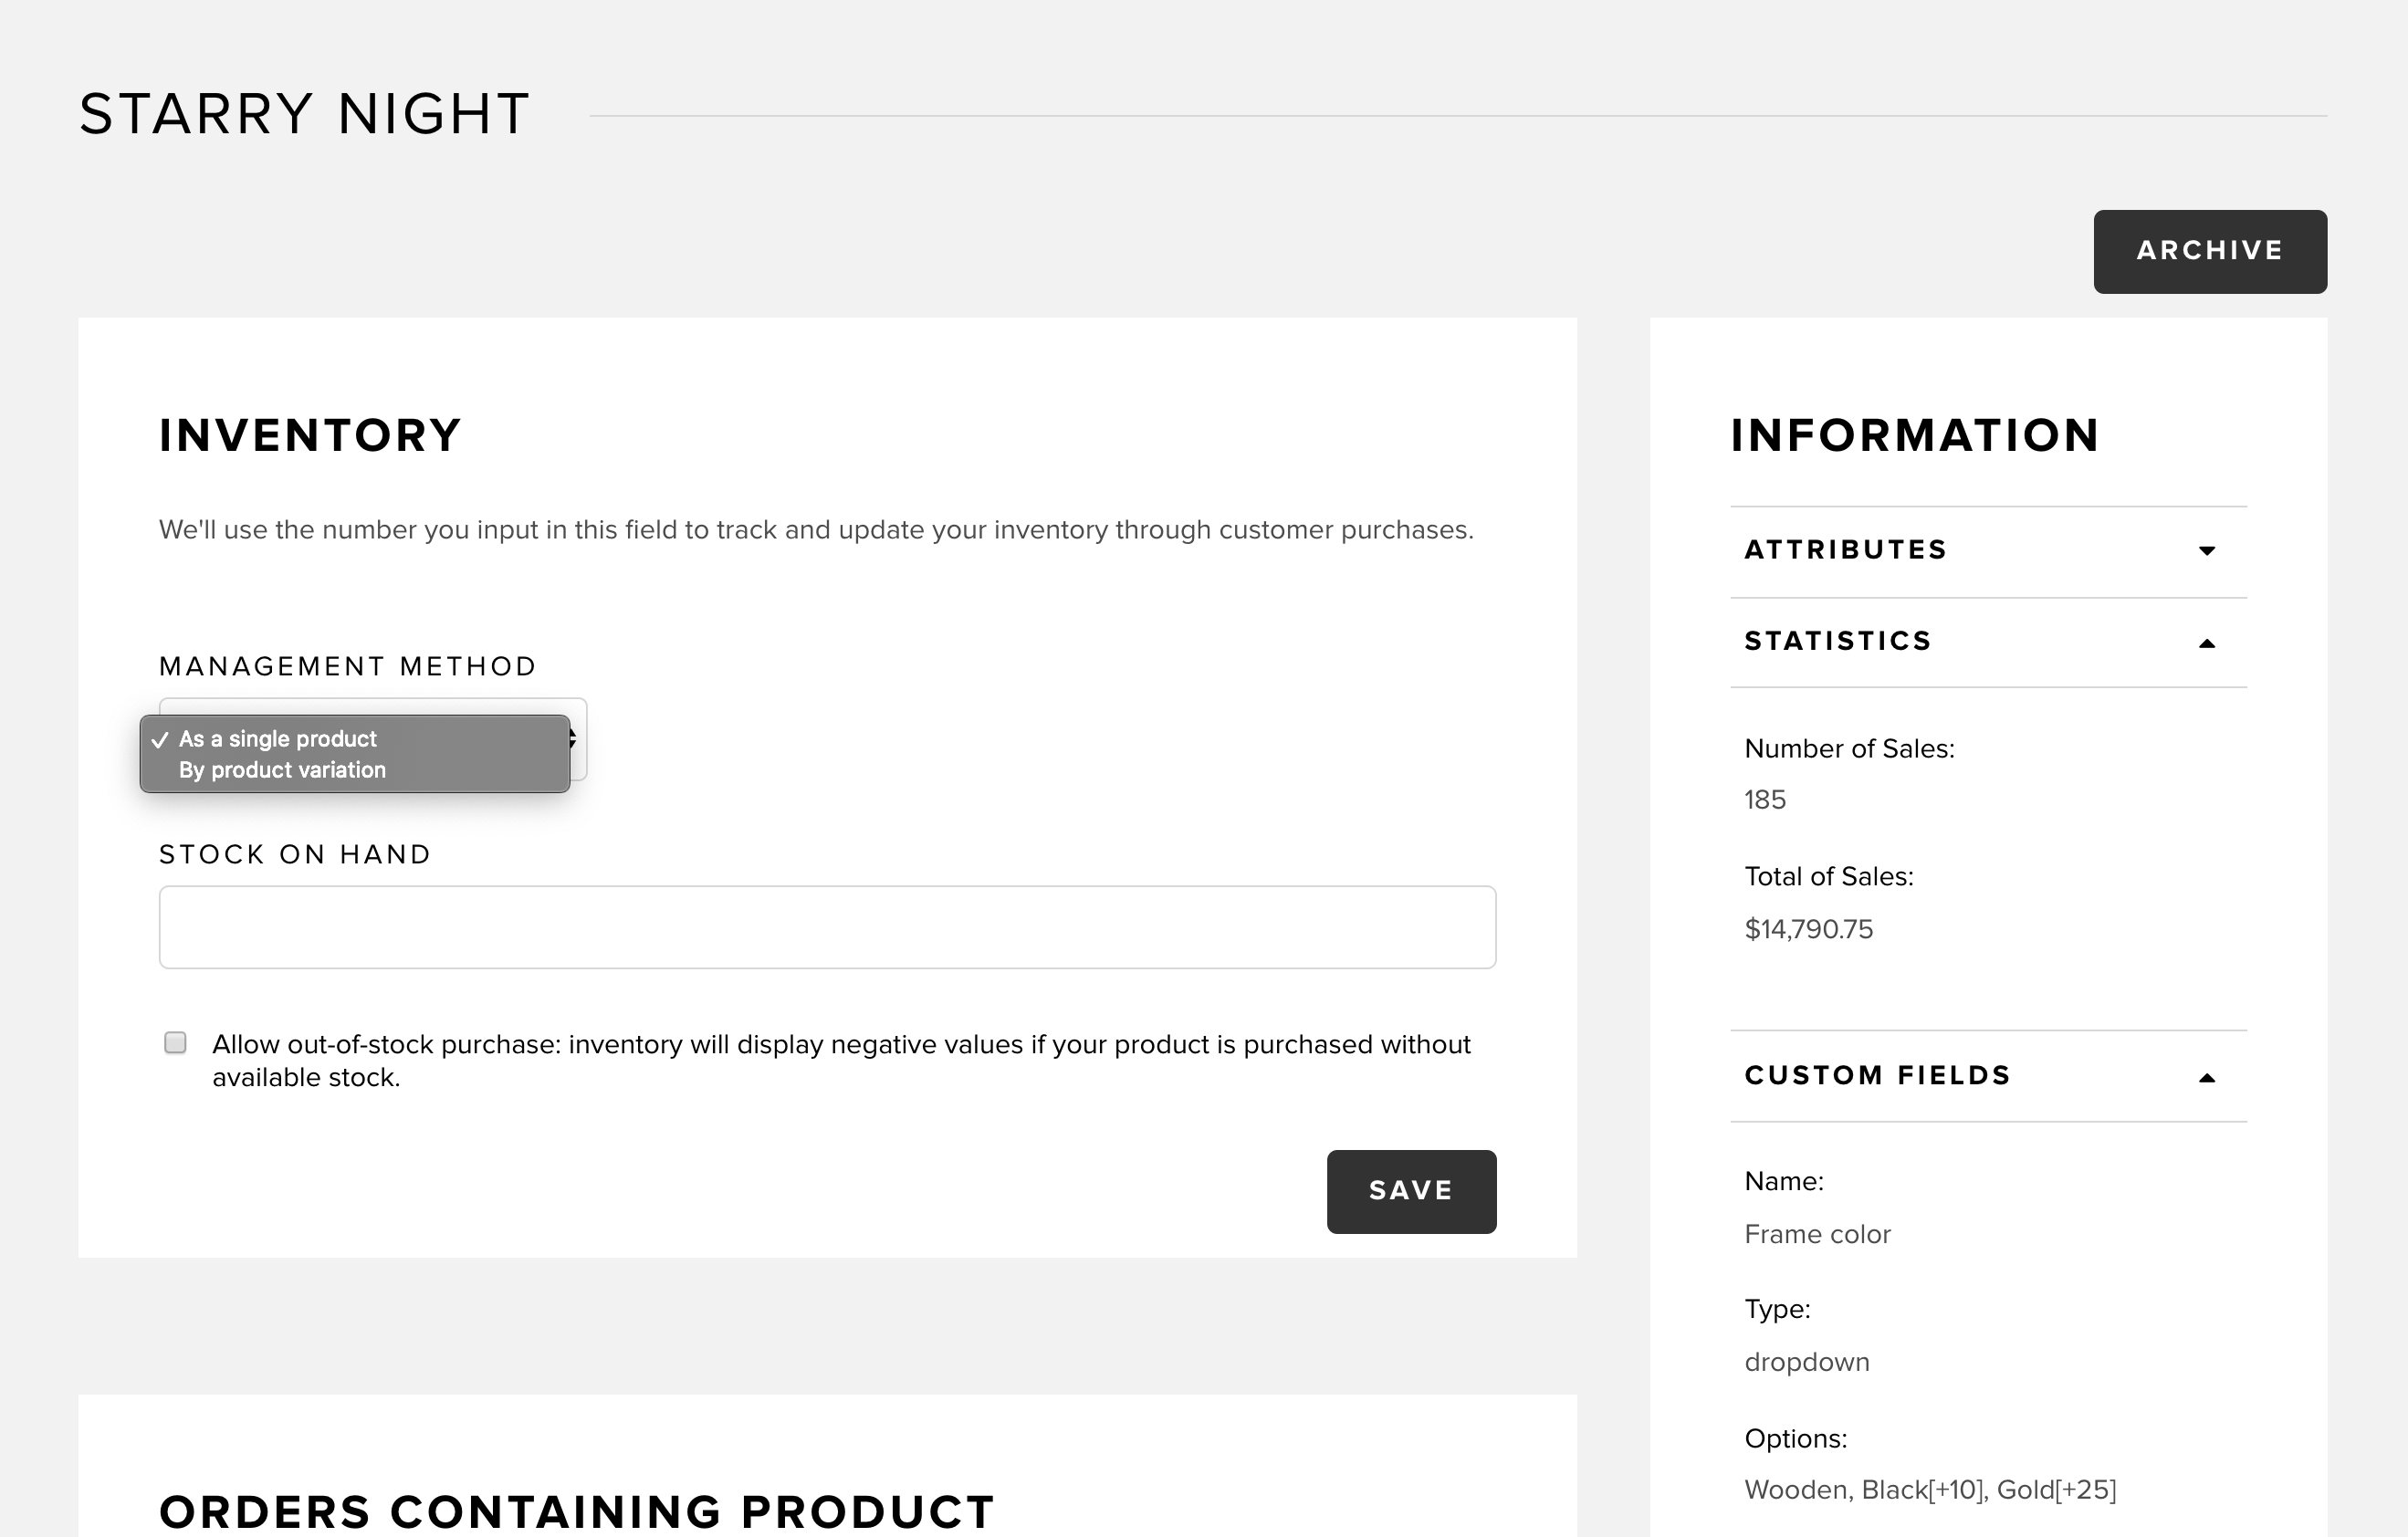
Once you define stock levels for your product or product options, Snipcart will automatically update them in your inventory by keeping track of all transactions on your store.
Inventory management method 1: As a single product
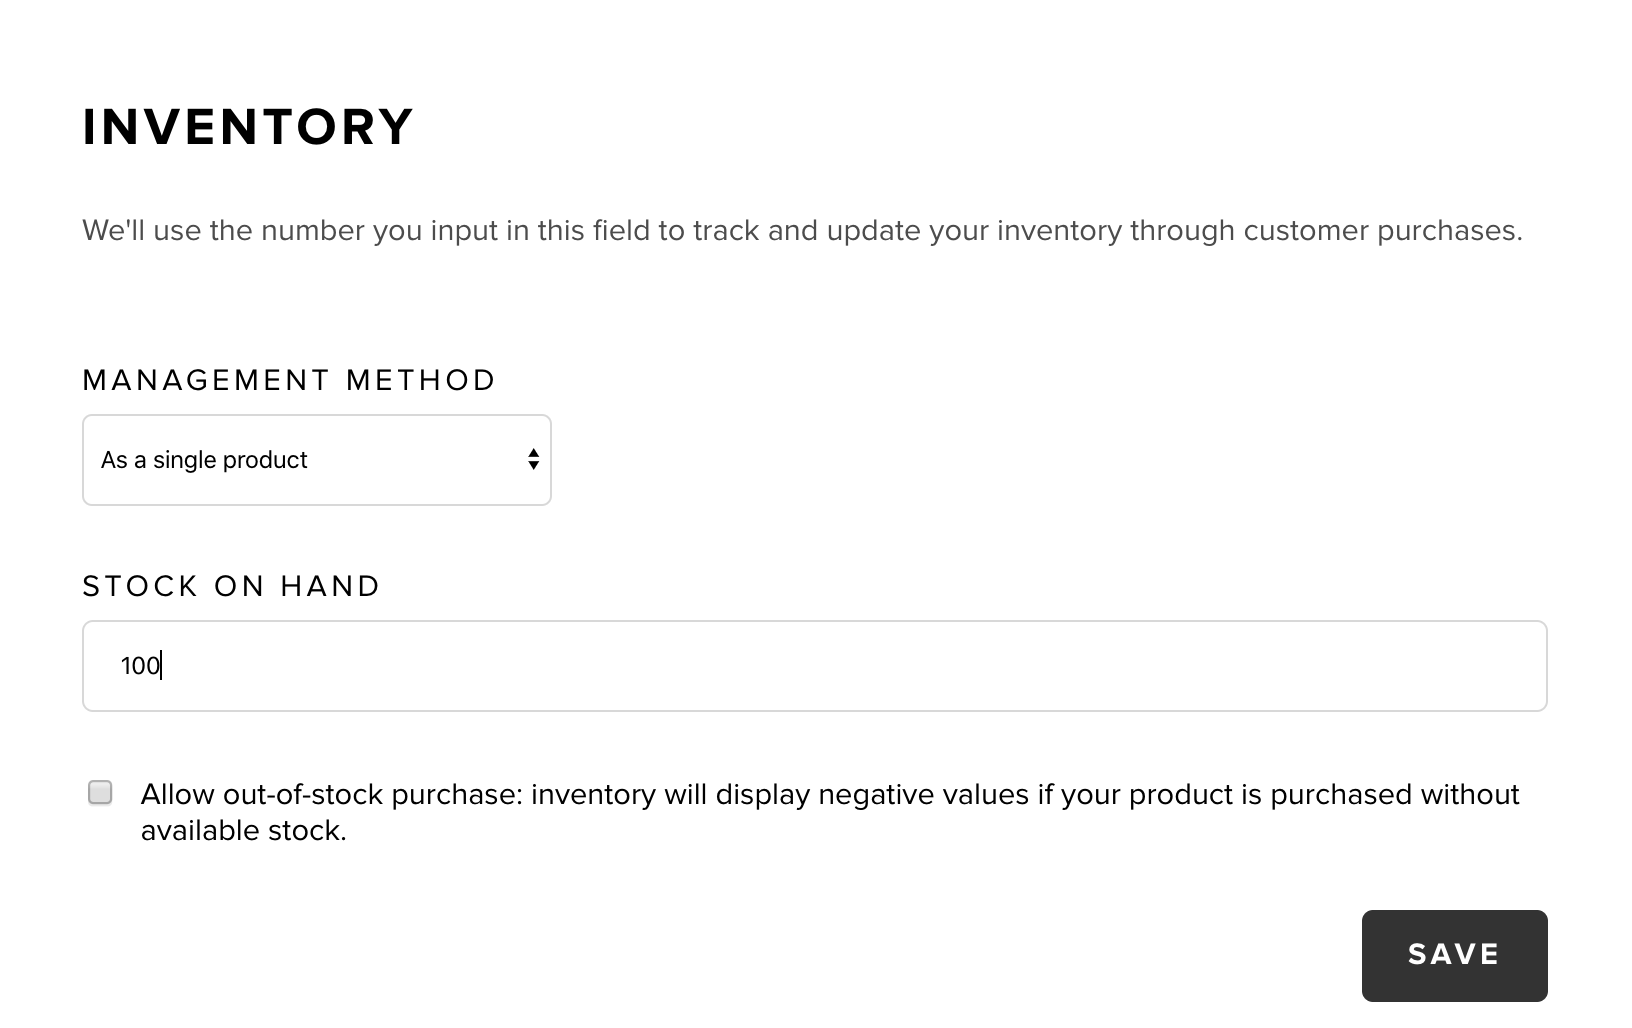
Enter the desired numerical value in the "Stock on hand" field, and hit "Save".
Inventory management method 2: By product variation
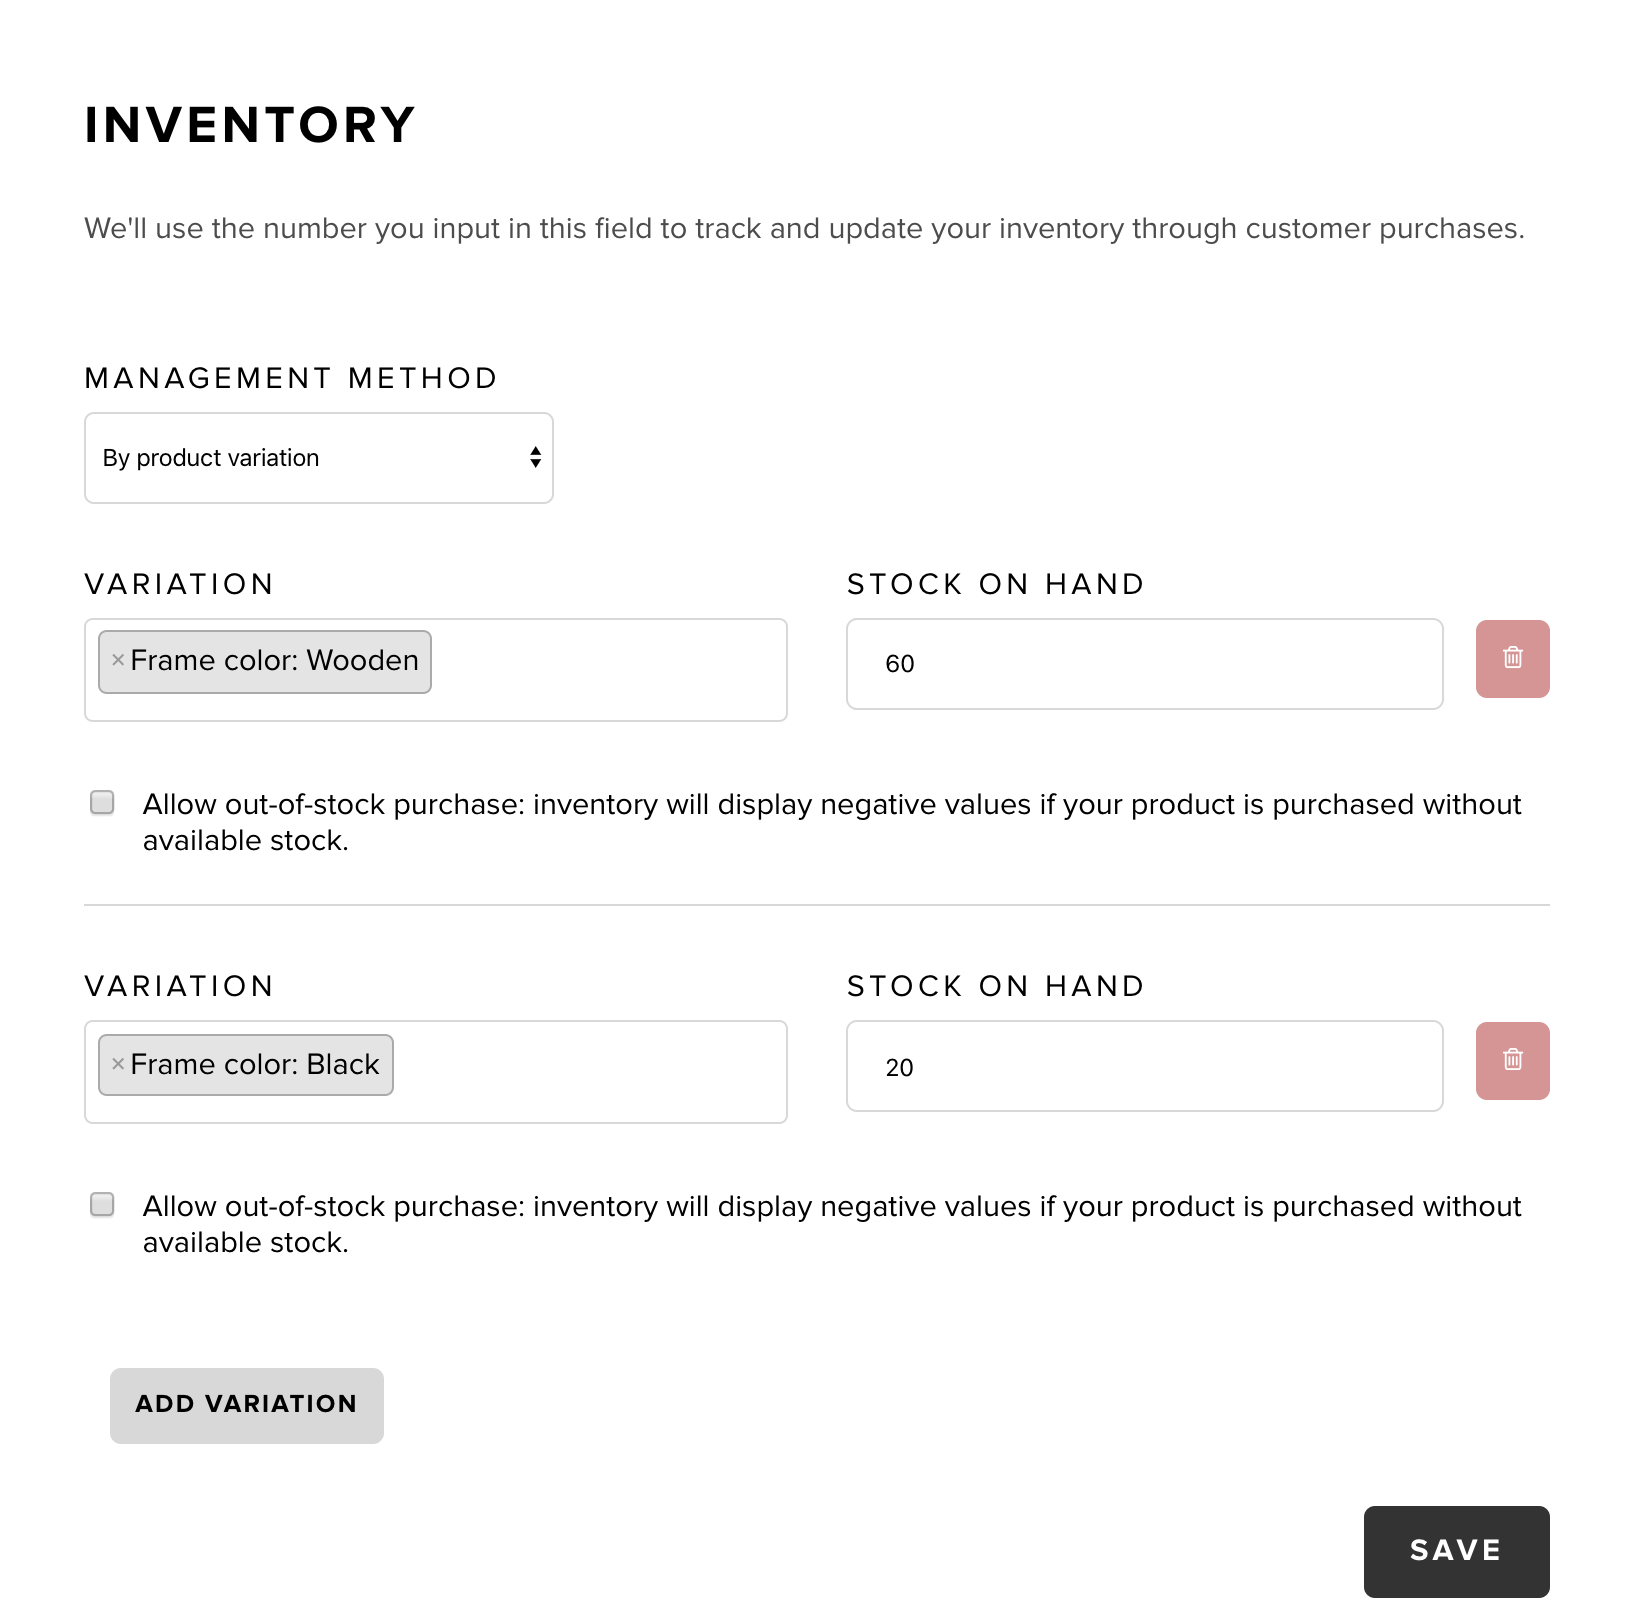
Start by choosing a product option in the "Variation" field (Snipcart will automatically list your custom fields when clicking on the field). Then, enter the desired numerical value in the "Stock on hand" option.
Hit the "Add variation" button to repeat the process for every other product option you need.
Once you're done, don't forget to hit "Save".
Allow out-of-stock purchase
By checking the "Allow out-of-stock" box, your inventory will display negative values if your product is purchased without available stock. We suggest making sure you have a good control over your stock replenishment process if you allow this option!
What happens if a customer tries to purchase an out-of-stock item?
If you haven't checked the "Allow out-of-stock" box, your customer will receive an in-cart notification that the item is not in stock anymore. It will prompt them to either remove it from the cart, or select another variant of the product if your inventory is managed by product variation (method 2 above).
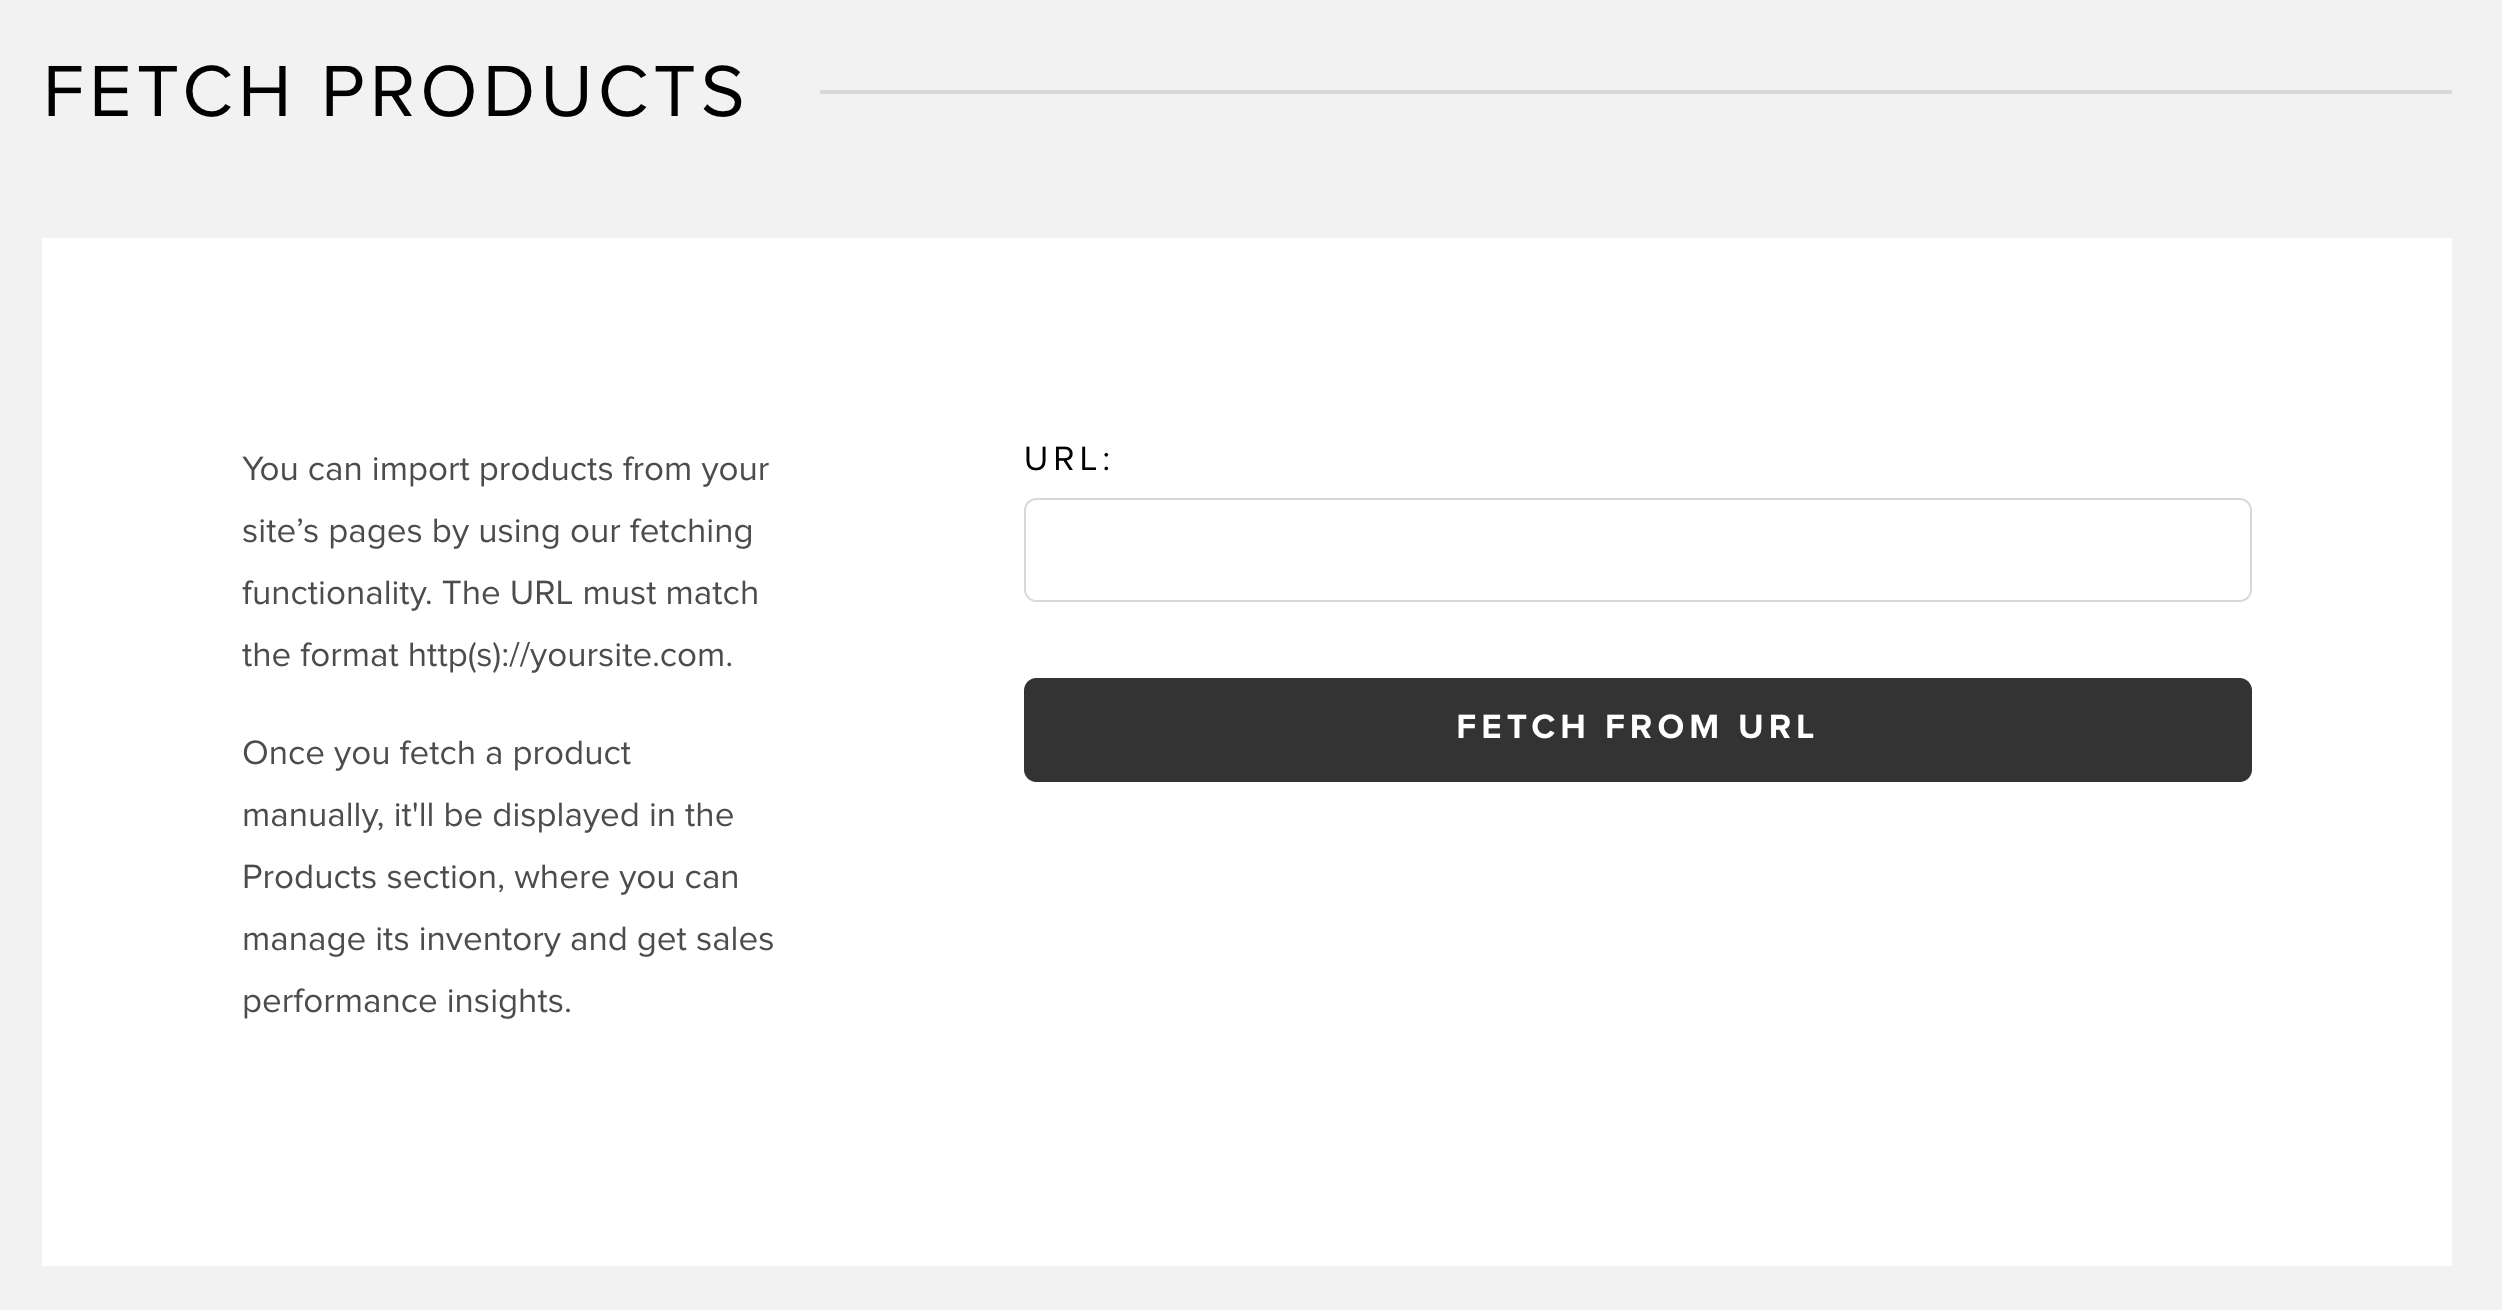
5.3 Manual product URL fetching
When a customer adds a product to your shopping cart, it shows up in your Products section of the dashboard. If you wish to list products that haven't been added to the cart yet, you can do it using the Fetch Products button. Enter the URL of the page containing your product and hit the Fetch from URL button.
If you'd like to display all of your products at once with this option, enter a URL where all of your products are listed.
6. Abandoned carts
This section displays your store's abandoned carts. The list shows all the shopping cart checkouts that were initiated but not completed on your site.
For a video tutorial about "Abandoned carts" scroll down to the next section, "Recovery campaigns."
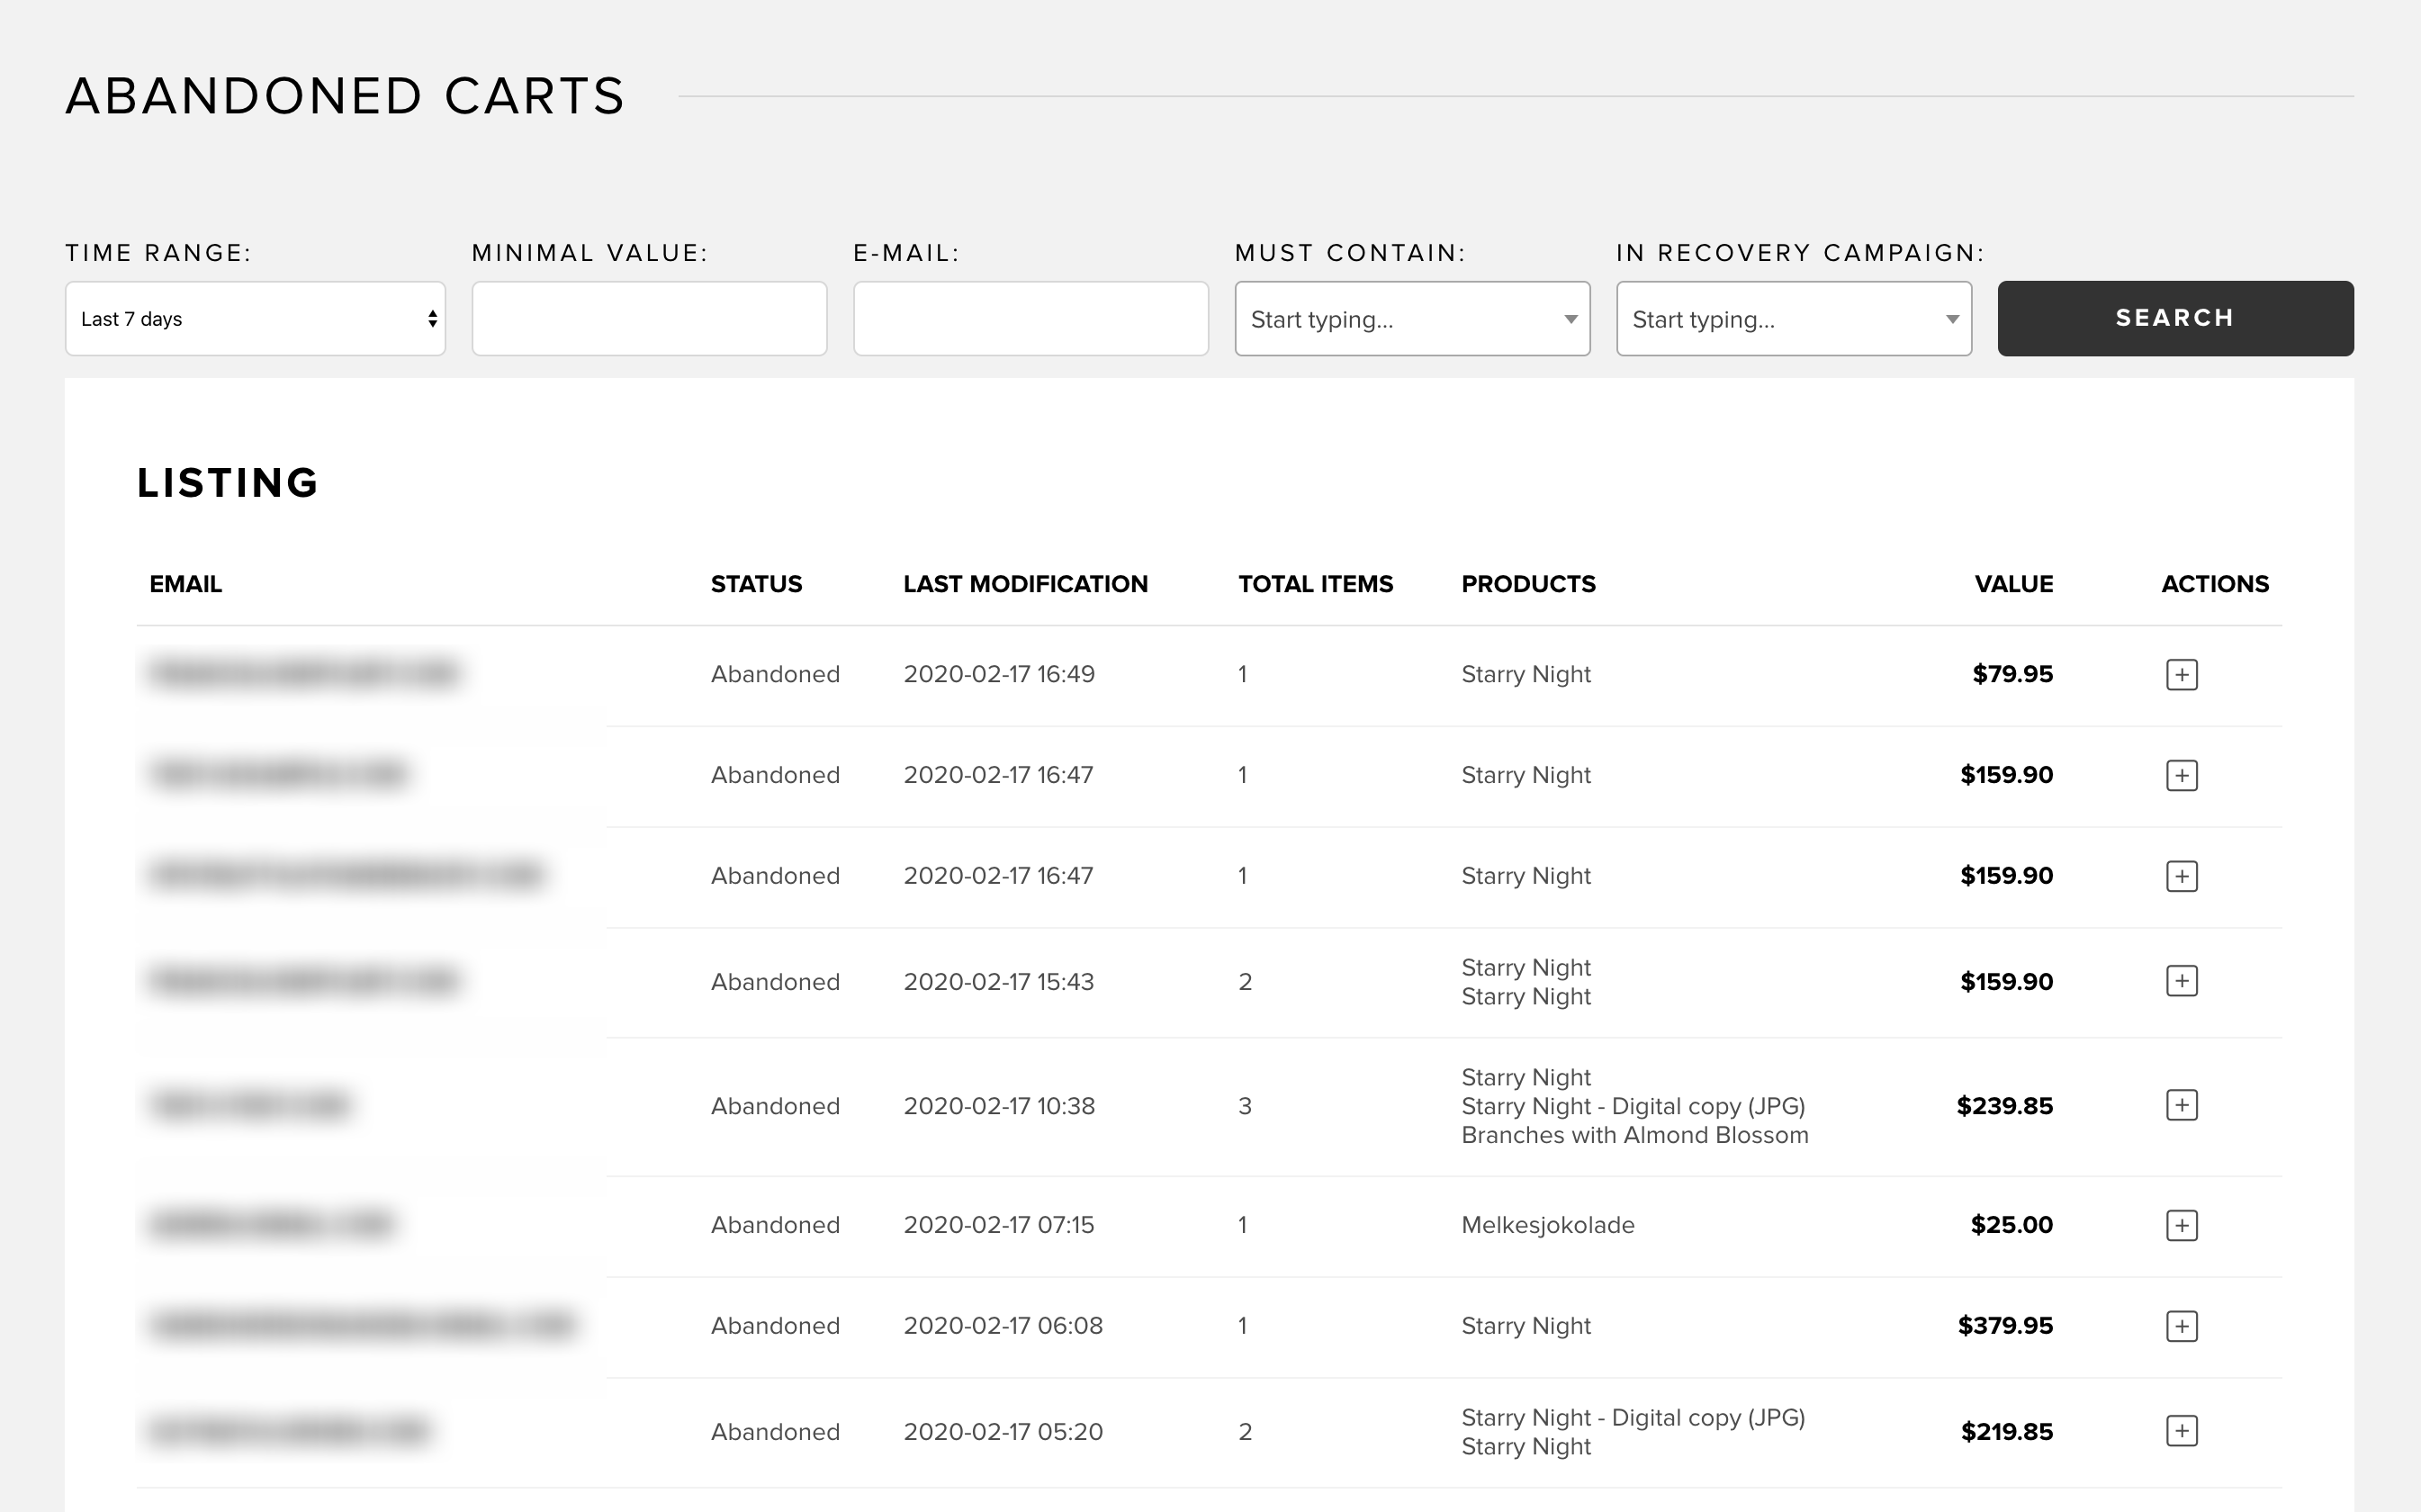
The main ID for these entries is your customer's email. You can search the list with different filters:
- Time range (abandoned last 4 hours, 24 hours, 7 days, and 30 days)
- Minimal order value
- Customer email
- Order products
- In recovery campaign
Define your search parameters, hit "Search", and a filtered list of your abandoned shopping carts will display on the screen.
6.1 Abandoned cart details retrieval emails
By clicking on an email address in your abandoned carts listing, you'll access the abandoned cart details screen.
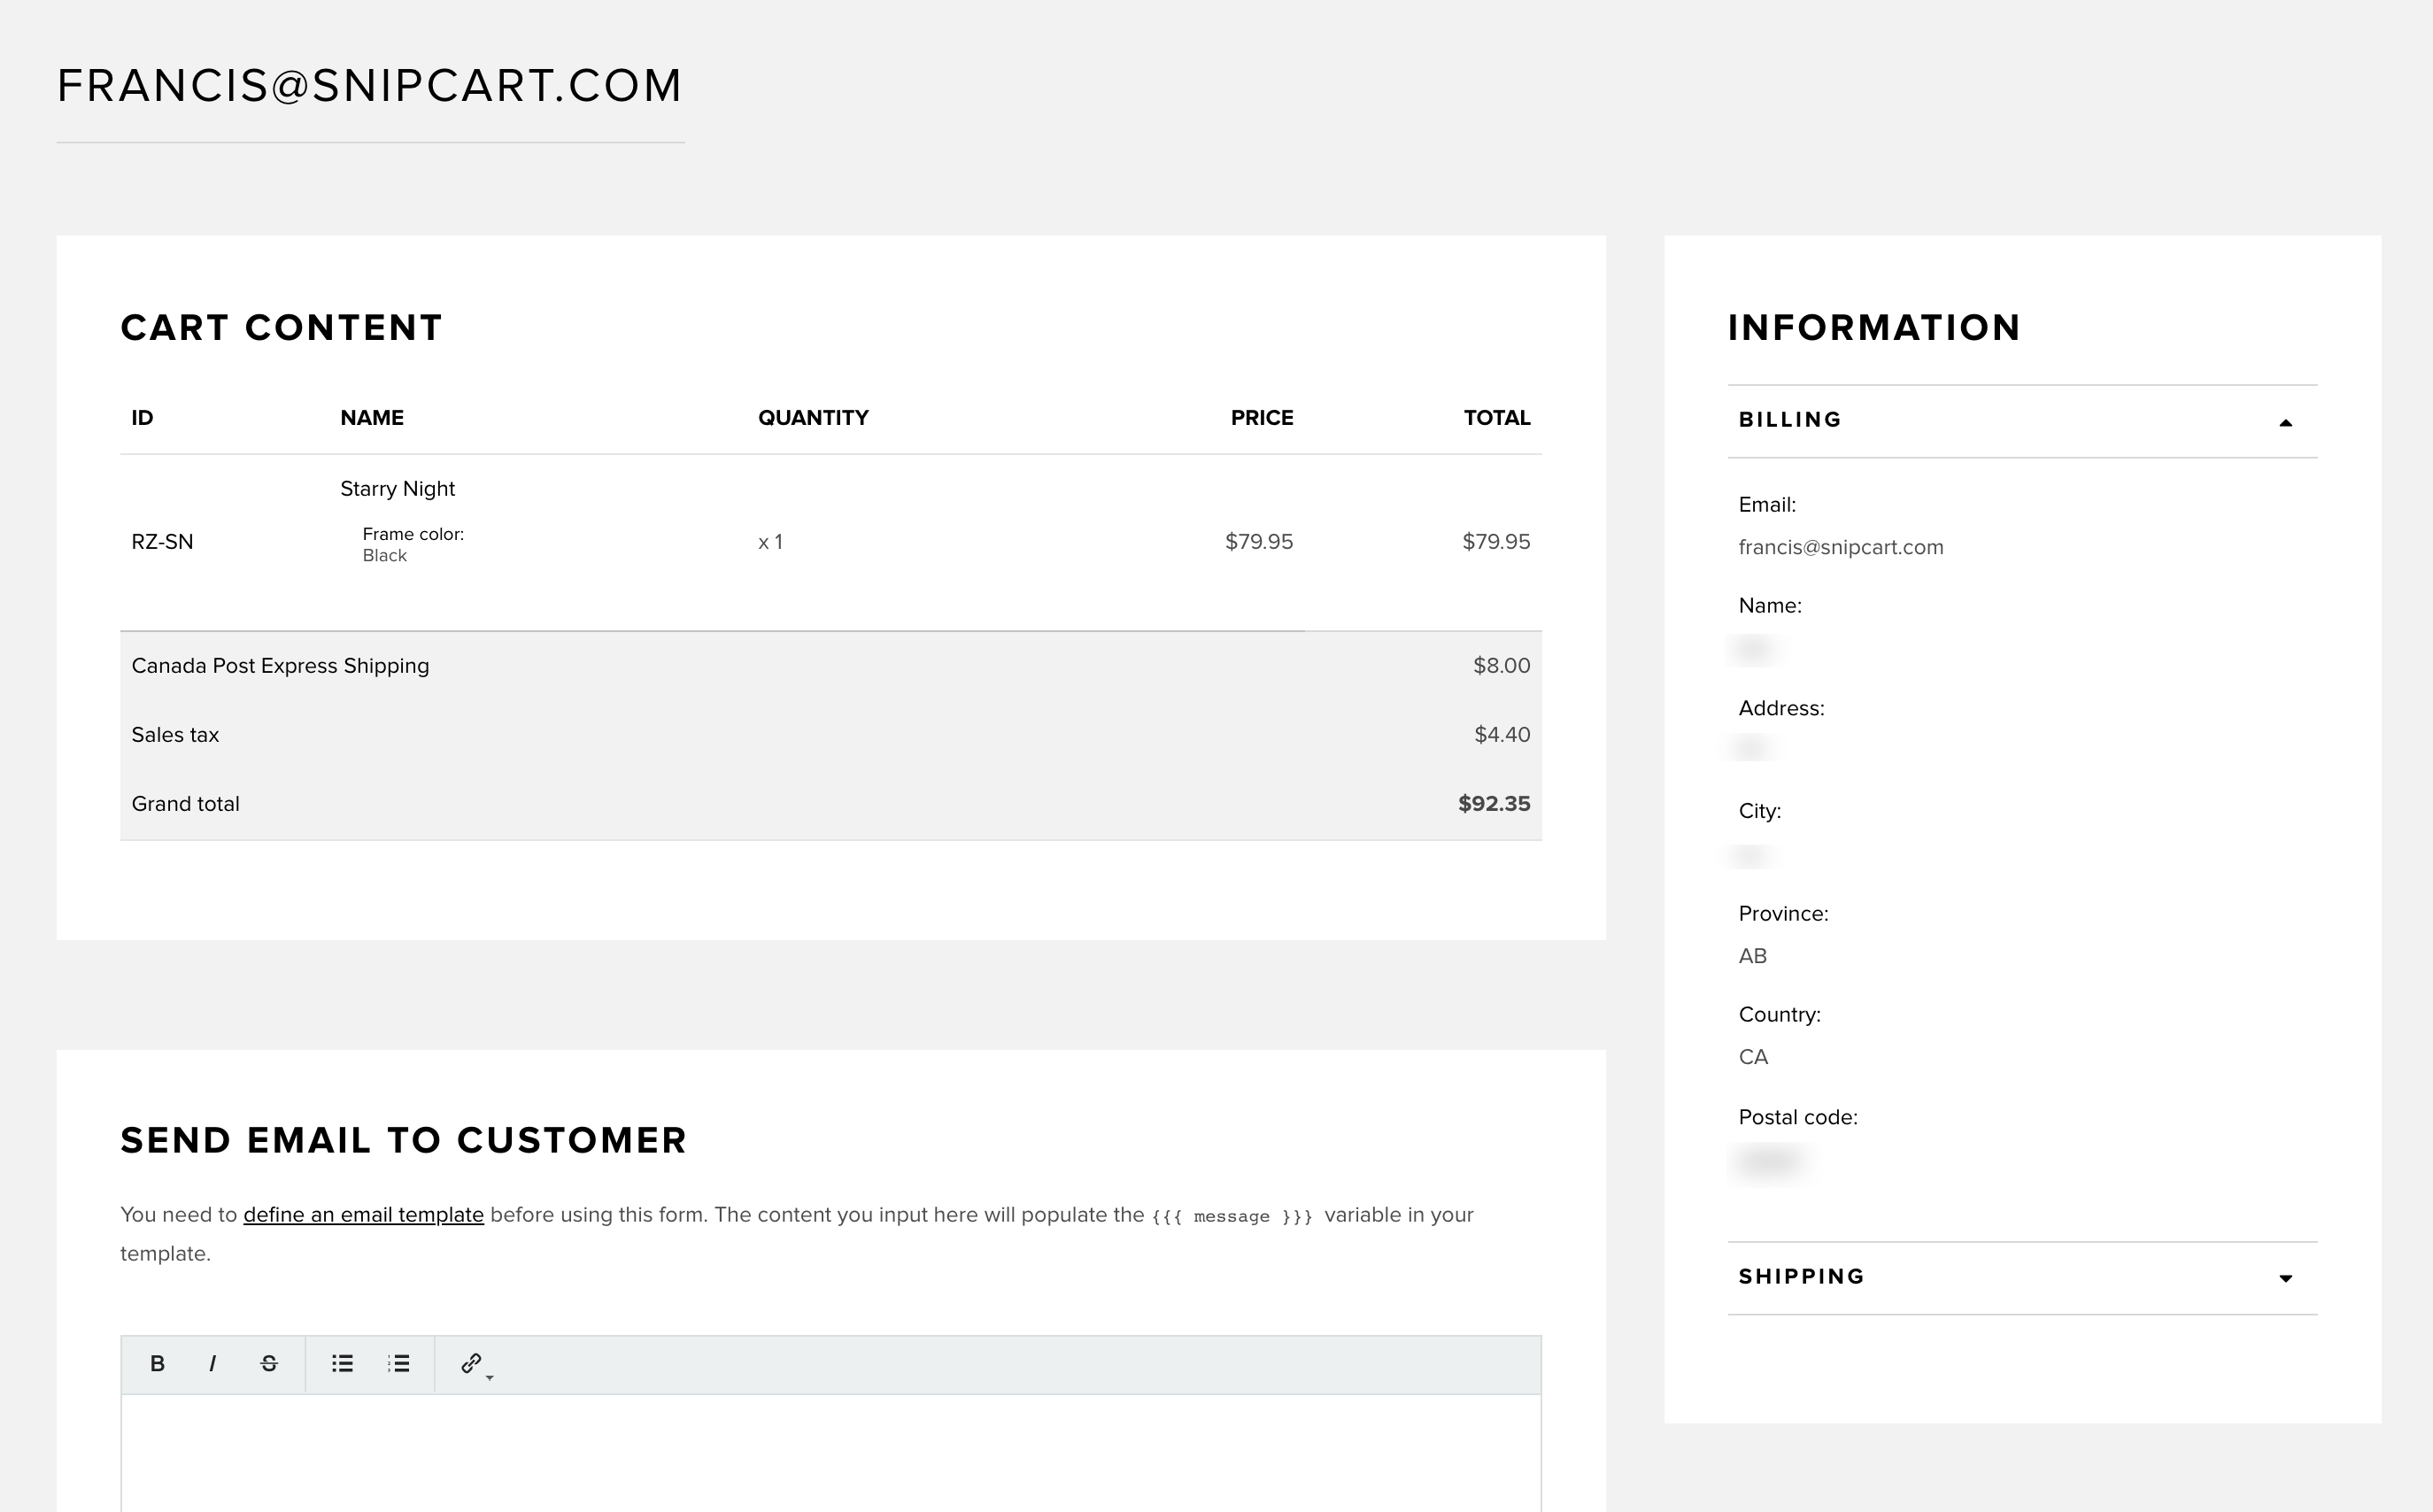
This section shows:
- The owner of the cart's customer information
- The abandoned cart's content (prices & products)
- The Send an email to customer rich text editor
- The history of emails sent to potential customers
You can use the rich text editor to send customized reminders and promotions to your potential customers. As of right now, the subject of the email cannot be changed.
For more powerful abandoned cart recovery tactics, read the next entry on Recovery Campaigns.
7. Recovery campaigns
In this section, you can create automated email campaigns to recover carts abandoned by your customers. A campaign is a multi-step process (max. 3). Each step represents an email triggered by "time since abandonment." You can customize email template, copy, and associated discount for each step.
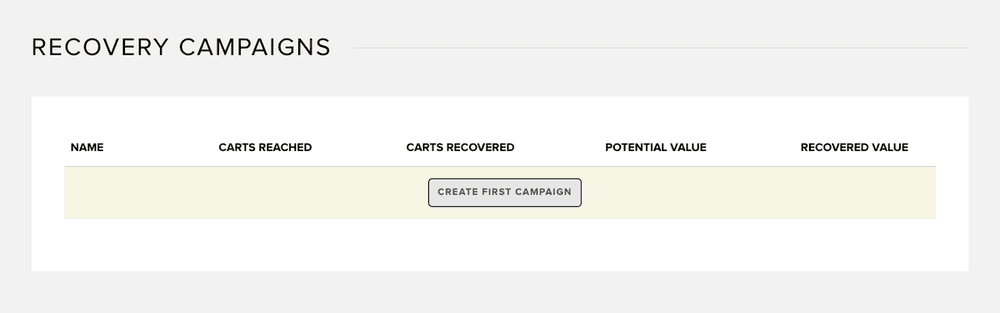
This page will display a list of your active campaigns. For each one you can see:
- Name of the campaign
- Number of emails (steps) sent in that campaign
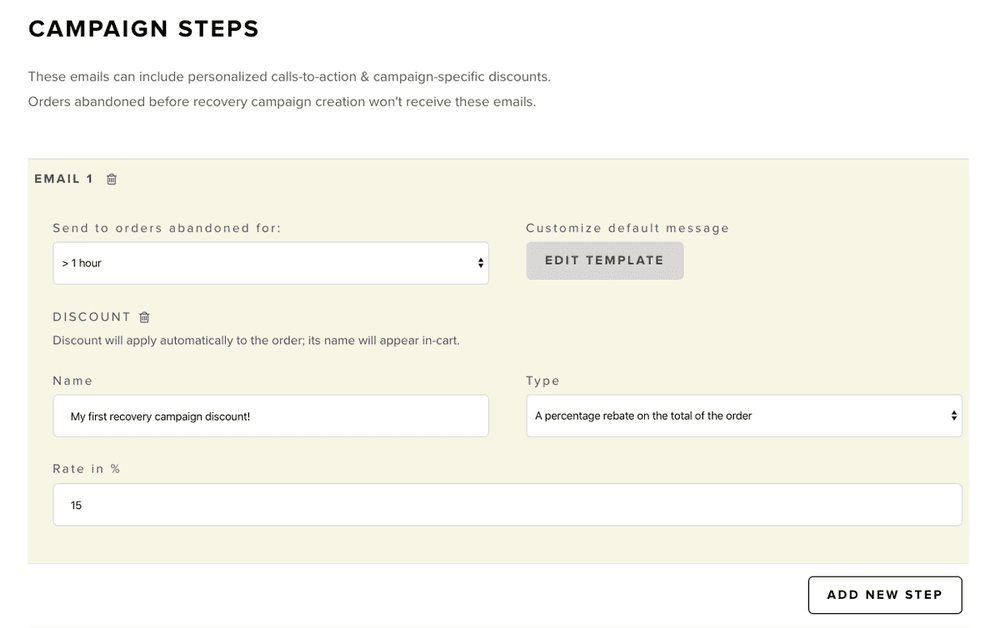
7.1 Campaign creation
Note that customers who've abandoned carts before campaign creation date won't receive the recovery emails.
Choose a name for your campaign, which will only appear in the recovery campaigns listing above.
Tthe "main" criterion allowing you to target specific groups of carts is the on order above field. For instance, you could create an aggressive recovery campaign targeting abandoned orders above 500 $, and a softer one targeting orders above 50 $.
An abandoned cart owner cannot receive emails from more than one campaign.
Abandoned carts will always be matched to the most specific campaign (e.g. a 600$ cart owner will receive the > 500 $ campaign emails, but not the > 50 $ ones).
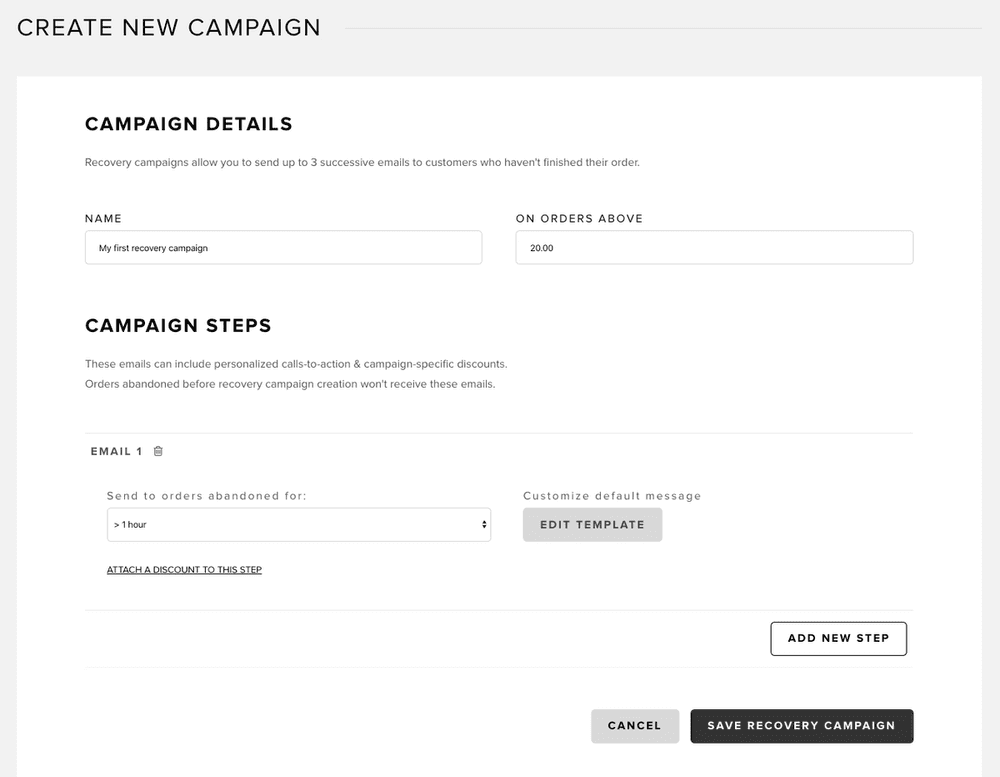
For each step of your campaign you can define:
- the time since cart abandonment that will trigger this step;
- a customized email template;
- the discount you will offer to targeted customers (optional).
To add a new step to your campaign, click the "Add new step" button.
There is a maximum of 3 steps per campaign.
When you're ready to create your campaign, hit the "Save recovery campaign" button at the bottom of the page.
7.2 Email templates
By default, the same pre-existing email template will be attached to each step. By clicking the "Edit template" button, you will access our email editor, where you can customize the template as needed.
You will find all the information you need regarding our email editor here.
The default email we send looks like this:
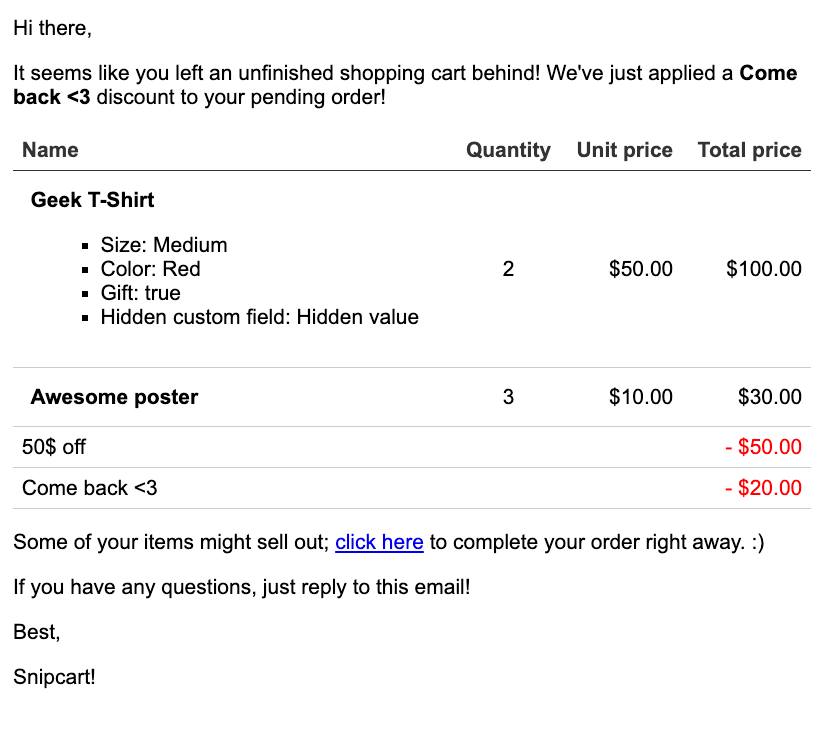
7.3 Discounts
A discount can be added directly to each step by clicking the 'Attach a discount" button. You will only need to define:
- Discount name (which will be seen by customers)
- Discount type
- Discount conditions
You can find more information about discounts right here.
The discount will then appear in the default email template and be automatically added to the abandoned carts targeted by the campaign.
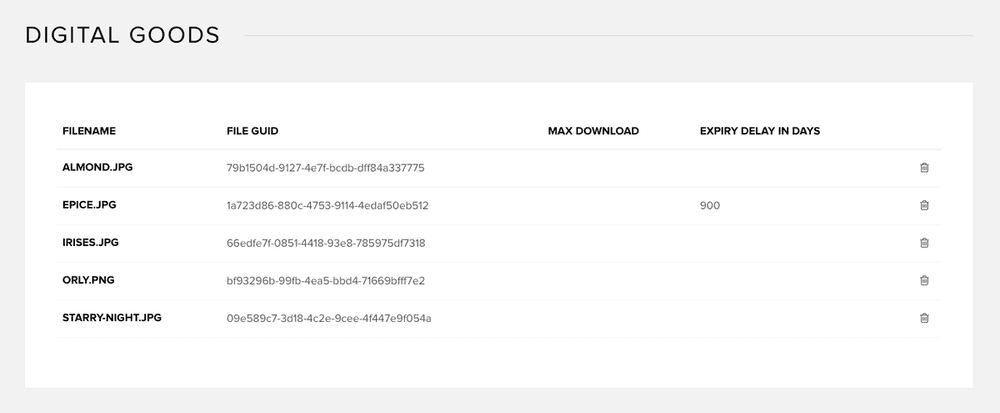
8. Digital goods
This sections allows you to manage digital goods.
After uploading any type of file (.mp3, .mp4, .pdf, etc.) with a drag and drop, you'll be provided with a GUID (identifier number). You'll be able to use this GUID to integrate your digital product in your website, like you'd do with normal products. Refer to the end of the product definition section to see how to use the data-item-file-guid attribute.
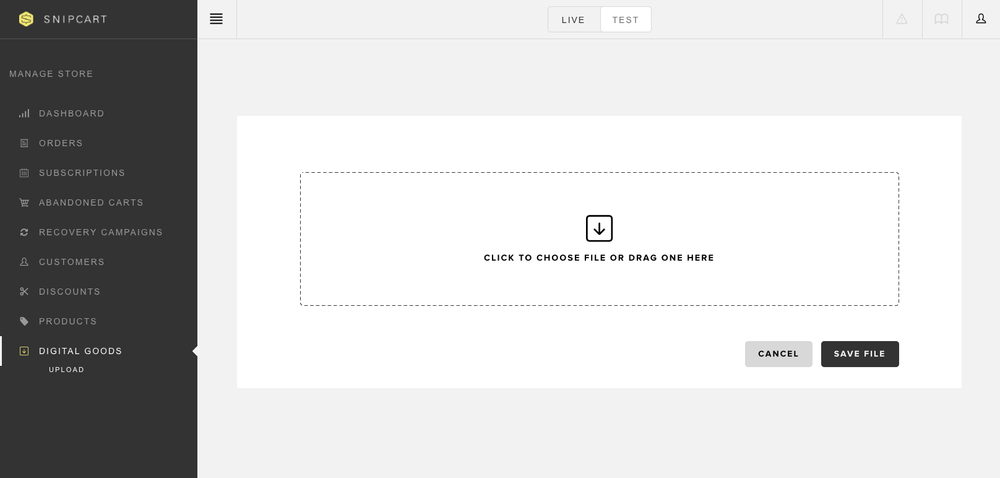
Click the "Upload" button from the menu or the "Upload first file" button from the empty listing to access this page.
To upload a new file, drag it into the drop zone. You can also click anywhere in the zone to browse files on your computer.
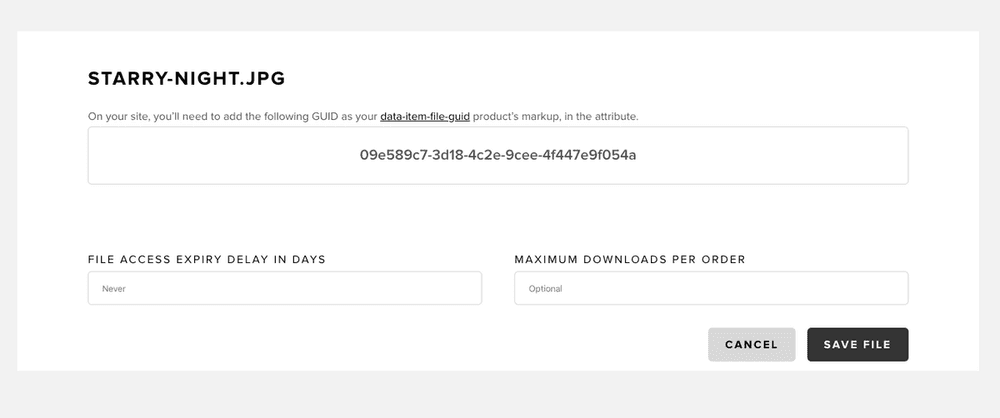
Once your file is uploaded, you'll land on the page above, which shows you 3 things:
- The GUID that has been generated for this particular file.
- File access expiry delay: Define the number of days the link you send to your customers will be accessible for.
- Maximum downloads per order: Define how many times a customer can download a file after the purchase.
Once you have one or multiple files uploaded you'll find a listing of all your digital products under the "Digital goods" section of your menu: